01 / SEE THE WHOLE REACH
The reach ladder
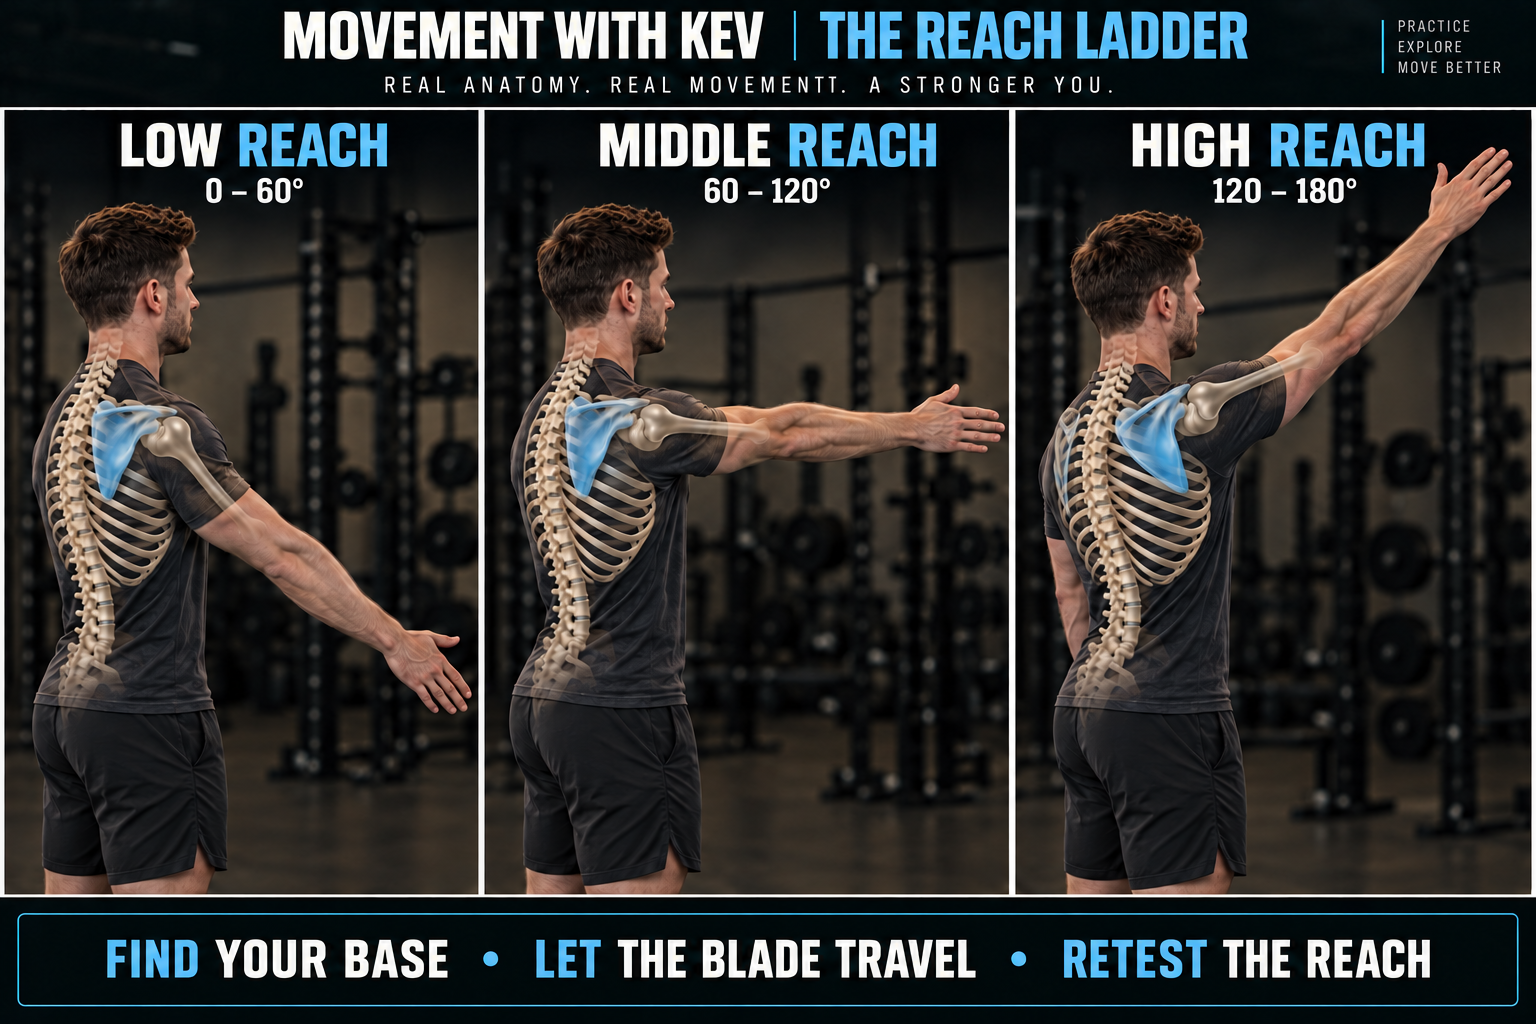
Read arm elevation relative to the torso: 0° at your side, 90° at shoulder height, and 180° overhead. The chart shows examples within three study bands. These are arm angles, not measurements of scapular rotation. You do not need to achieve 180° to have a useful reach.
0–60° / LOW REACH
Find the base before adding height.
What moves: the humerus moves forward relative to the scapula while the blade can travel around the rib cage. The amount of blade motion depends on the task. Low elevation does not mean the blade must stay fixed or rotate downward throughout the reach.
MWK cue: “Feel your contacts. Reach softly forward. Let the blade follow.” Keep your jaw easy and avoid turning the reach into a hard abdominal crunch.
Look for: a small, repeatable reach with manageable effort. Notice whether the whole trunk tips forward, the breath stops, or the neck does most of the work. Describe those observations before deciding what they mean.
Try: sit with feet supported and reach toward a low target. Compare the same target before and after one cue. Change the target or support if the position is uncomfortable.
60–120° / MIDDLE REACH
Let the blade wrap and turn.
What moves: the arm passes through shoulder height. Scapular upward rotation contributes as elevation increases; forward reaching also involves travel around the curved thorax. These motions overlap rather than starting at an exact degree boundary.
MWK cue: “Let the blade travel around the chassis. Keep your base available.” Avoid pulling the blades together while trying to reach forward.
Look for: how the arm, scapula, and trunk share the task. If the sternum turns, note that separately from arm elevation. A hand reaching farther may reflect trunk motion rather than more shoulder motion.
Try: a comfortable wall-supported reach near shoulder height. Reach and return gently. Retest an unloaded reach with the same stance and target; compare effort as well as distance.
120–180° / HIGH REACH
Make room for the arm overhead.
What moves: the blade generally upwardly rotates and posteriorly tilts as the arm rises. The humerus also moves relative to the blade, and the collarbone participates. There is no single fixed arm-to-blade ratio to force onto every person.
MWK cue: “Let the blade travel up with the arm. Reach only as high as you can repeat.” Do not hold the shoulders down and back throughout the movement.
Look for: the relationship between arm elevation and trunk extension. Leaning back may help the hand rise in the room without the same change relative to the torso. Some trunk movement belongs to real tasks; simply name it when comparing trials.
Try: an unloaded high reach first. Use a comfortable range and return with control. An overhead DB press adds load and elbow extension, so it needs its own baseline rather than being treated as the same task.
Study the overhead DB press →BREATHING SPACE / FOLLOW THE ARC
Back → front-upper → front-lower.
The reach gives us a position to explore. The inhale lets us notice how the chassis responds. Use these as MWK breathing-attention targets, then check the person’s response. There is no on/off switch at 60°, 90°, or 120°; angle alone does not establish regional expansion.
Lower back ribs → upper back ribs
Upper front ribs + lower back
Lower front / side ribs + upper front + lower back
Expansion means movement of the chest wall. “Breathe into the back” is an attention cue; air enters the lungs. A sensation, a changing shirt outline, or a higher hand position does not by itself tell us exactly which ribs moved.
Anatomy reference: Movement of the ribs in supine humans for small and large changes in lung volume. This study describes pump-handle and bucket-handle components and their variability; it does not validate the MWK reach-angle map.
TURN THE CHASSIS / ONE ARM AT A TIME
Steering the rib cage.
A single-arm reach can combine the blade wrapping around the ribs with the thorax turning. Follow the sternum, the rib cage, and the pelvis separately. Reaching farther with the hand does not tell you how much each part moved.
Right and left always mean the person’s own sides. The forward-moving side describes orientation; expansion describes shape change during breathing. They can occur together, but one does not prove the other.
Turn above the base. Then let the whole chassis turn.
First, use an easy seated reach with both feet supported. Let the pelvis stay quiet enough to serve as a reference, without clamping it rigidly. Observe whether the sternum changes direction above it. Next, allow the pelvis and thorax to turn together. Compare the two tasks: one explores relative motion; the other changes the orientation of the whole chassis.
Reach → turn → breathe → return
- Find your contacts: use a supported position and a comfortable target near shoulder height.
- Reach with one arm: allow a small turn, then notice where the sternum faces. Keep the jaw and neck easy.
- Explore the diagonal: right reach, right front + left back; left reach, left front + right back. Take two or three easy breaths as an observation trial.
- Return and compare: repeat the same unloaded reach. Note comfort, effort, breathing sensation, and trunk movement.
- Change one variable: try a lower target, a little more support, or the opposite arm. Record “no clear change” when that is what you find.
More ways to explore breathing space
Sternum: change the reference
Your notes pair a gently higher sternum with front-rib attention and a gently lower sternum with back-rib attention. Explore a small change. Avoid substituting a large back arch or a hard slump for breathing movement.
Body position: change the support
Supine, prone, and sidelying give different surfaces to breathe against. In Home Base, notice back and side contact; in sidelying, compare the supported side with the upper side and the front/back ribs. Contact pressure and perceived expansion are different observations.
Hand position: change one thing
Compare a comfortable palm-down and palm-up reach while keeping the target and trunk position similar. Notice whether effort or breathing changes. Hand position alone cannot establish scapular rotation or where the rib cage expands.
Reach height: revisit the arc
With the same base, explore low, middle, and high targets. Use back, front-upper, and front-lower as attention prompts. Choose the position that makes the intended task easier to repeat, rather than chasing a larger angle.
02 / NAME THE MOVEMENT
The blade rides the ribs.
The scapula is the shoulder blade. Its medial border is nearest the spine; its inferior angle is the lower tip; its glenoid is the socket meeting the upper-arm bone. Use those landmarks to describe motion instead of judging the hand position alone.
Wrap / return
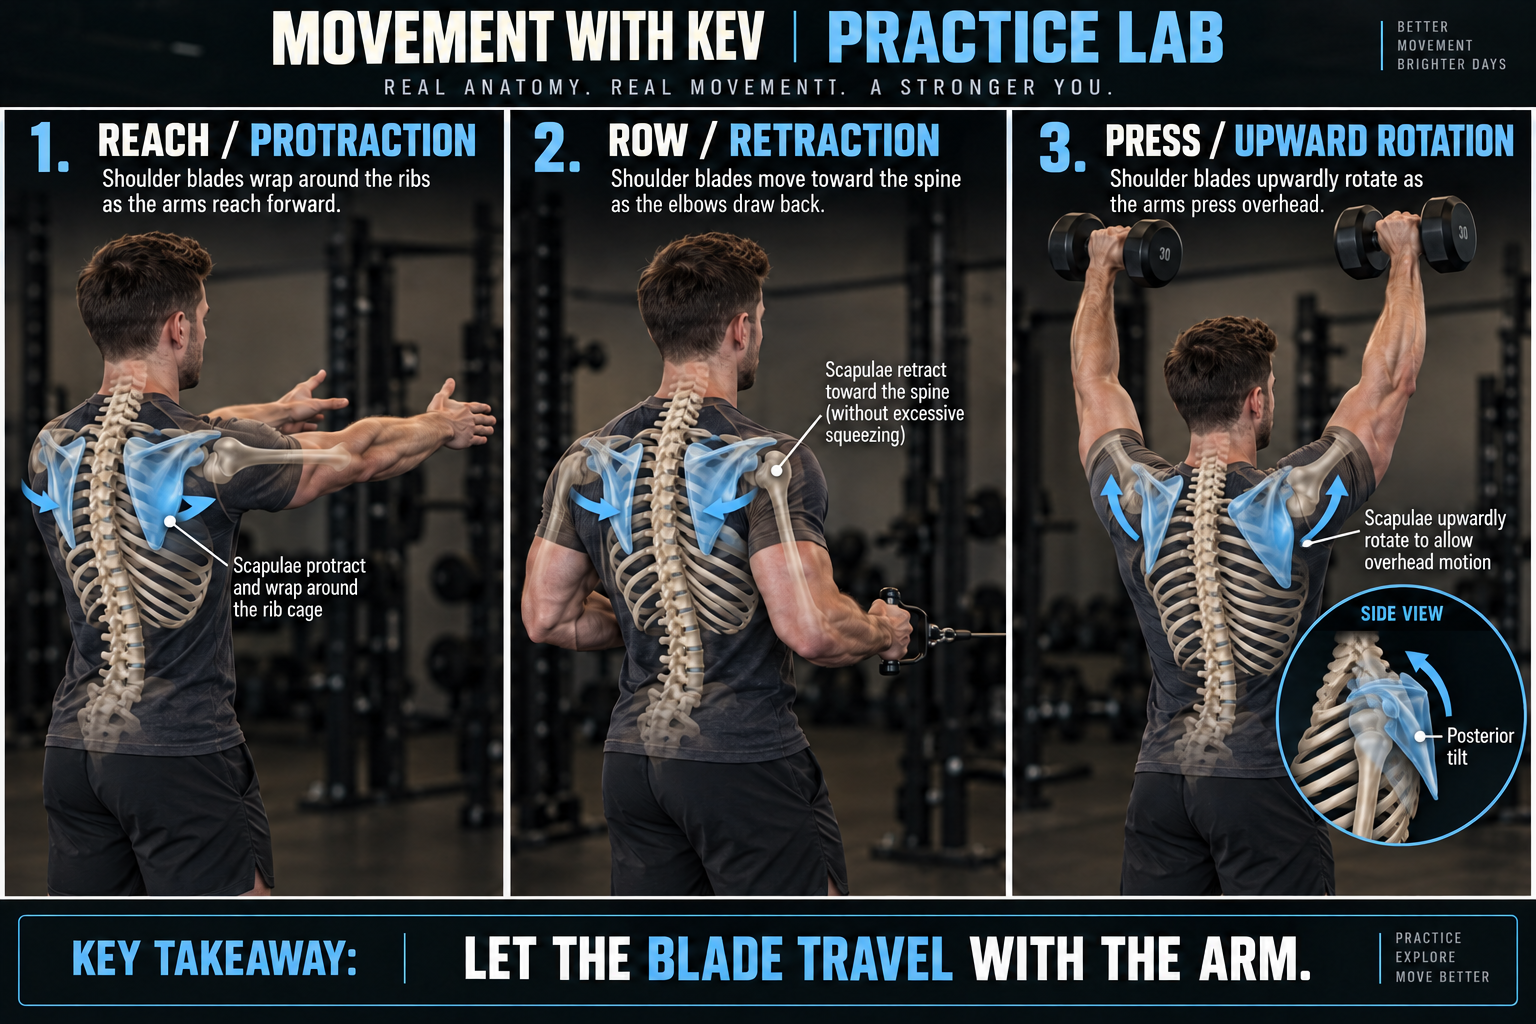
Protraction takes the blade around the thorax, away from the spine. Retraction brings it back toward the spine. The curved surface matters: this is not a flat slide across your back.
Turn the socket upward
Upward rotation turns the glenoid toward the overhead task as the inferior angle moves outward. It is different from elevation, where the blade moves upward on the thorax. A shoulder shrug alone does not describe upward rotation.
Tip in three dimensions
Posterior tilt brings the upper scapula backward relative to the thorax while the inferior angle moves toward the ribs. The side-view inset helps explain this component; a rear view alone cannot show the complete movement.
Separate blade, arm, and hand
Scapular internal/external rotation is motion of the blade relative to the thorax. Humeral rotation is upper-arm motion relative to the scapula. Pronation/supination is forearm motion. A palm-up or palm-down position cannot prove a particular scapular orientation.
Rear rail: the MWK attention region between the inner shoulder-blade border and the spine. Use it as a reference in the demonstrated setup, not as a command to pin the blades or hold a muscle tight.
Anatomy background: The Coupled Kinematics of Scapulothoracic Upward Rotation. Illustrations show relationships, not an individual’s measured joint motion.
03 / POSITION → REACH → BREATHE → RETEST
Change one thing. Ask a better question.
Your source uses “back,” “front-upper,” and “front-lower” as breathing-attention themes for the reach bands. Treat them as areas to explore, not guaranteed expansion patterns. Arm angle alone cannot tell you which ribs expanded or what tissue changed.
A simple reach experiment
- Map: choose a meaningful target, such as an easy shelf reach. Note the stance, arm, target height, and effort.
- Position: choose a manageable supported reach. Seated, supine, sidelying, and standing change support and gravity; keep track of which you use.
- Explore: change only one feature—reach height, support, or a cue. Leave the other features as consistent as possible.
- Breathe: use a few easy breaths without forcing a bigger inhale or hard exhale. Notice the experience around the ribs; sensation is information, not a direct measurement of expansion.
- Retest: return to the original shelf reach. Compare effort, range relative to the torso, and control. Check again later before assuming the result will carry over.
If the result is unclear: record “no clear change.” Simplify the experiment instead of adding several corrections. Stop the affected trial if it brings new or worsening symptoms.
Revisit the right-front / left-back steering experiment ↑
What the coach can say
“Your hand reached higher, and your trunk leaned farther back. Let’s use the same target and see whether a little support changes the effort.” That statement separates an observation from a theory and gives the next trial a clear purpose.
04 / TEACH IT BACK
Five quick checks.
Which regions do I explore with a right-arm reach?
In the MWK steering setup: right front and left back. Observe the sternum turning left and distinguish that turn from the chest-wall movement you are exploring on the inhale.
Does 120° automatically create bucket-handle expansion?
No. High reach is a lower-front and lower-side attention target in this model. Bucket-handle describes side-to-side rib-cage widening; reach angle alone does not prove it occurred. Compare the breathing experience and retest.
At 90°, am I measuring scapular rotation?
No. Here, 90° describes the arm at shoulder height relative to the torso. Arm elevation combines motion at multiple parts of the shoulder complex; it is not the scapula’s angle.
If I turn my palm up, have I proved scapular external rotation?
No. Forearm rotation, humeral rotation, and scapular rotation are different actions. Name the segment and reference before drawing that conclusion.
A high reach feels easier after the drill. What next?
Retest the original task under the same conditions, record what changed, and check again later. An immediate improvement does not establish the mechanism or automatically justify more load.
Original PDF and extracted course notes
The original is retained for comparison. Its angle bands, expansion themes, and muscle lists are source-model descriptions; the teaching guide above distinguishes those from directly observable movement. Some source text is incomplete.
DOCUMENT LIBRARY
Original file preserved as uploaded. Some original headings or text are obscured; the text edition below is provided alongside it. No corrections have been made to the original.
Some prose in the extracted source is incomplete. Missing words have not been reconstructed.
Text reproduced from the uploaded document. This text view does not reproduce original illustrations, color coding, or page layout. Use the document links above to view the original layout. Table columns in the extracted text may not retain their relationships.
Source page 1
Source page 2
Source page 3
Source page 4
Source page 5
Source page 6
Source page 7
Educational study material. Not medical diagnosis, treatment, or individualized exercise clearance.