Use the MWK vocabulary to connect contacts, stack, and movement. Study the anatomy charts, try a small movement, teach the idea back, then check what your practice actually changed.
Original MWK anatomy illustrations and teaching explanations. Chassis, rear rail, and occupancy are coaching references. Use the artwork to understand relationships; use observation and a consistent retest to understand your own task.
01 / YOUR CHASSIS REFERENCES
Feel the base. Organize enough to move.
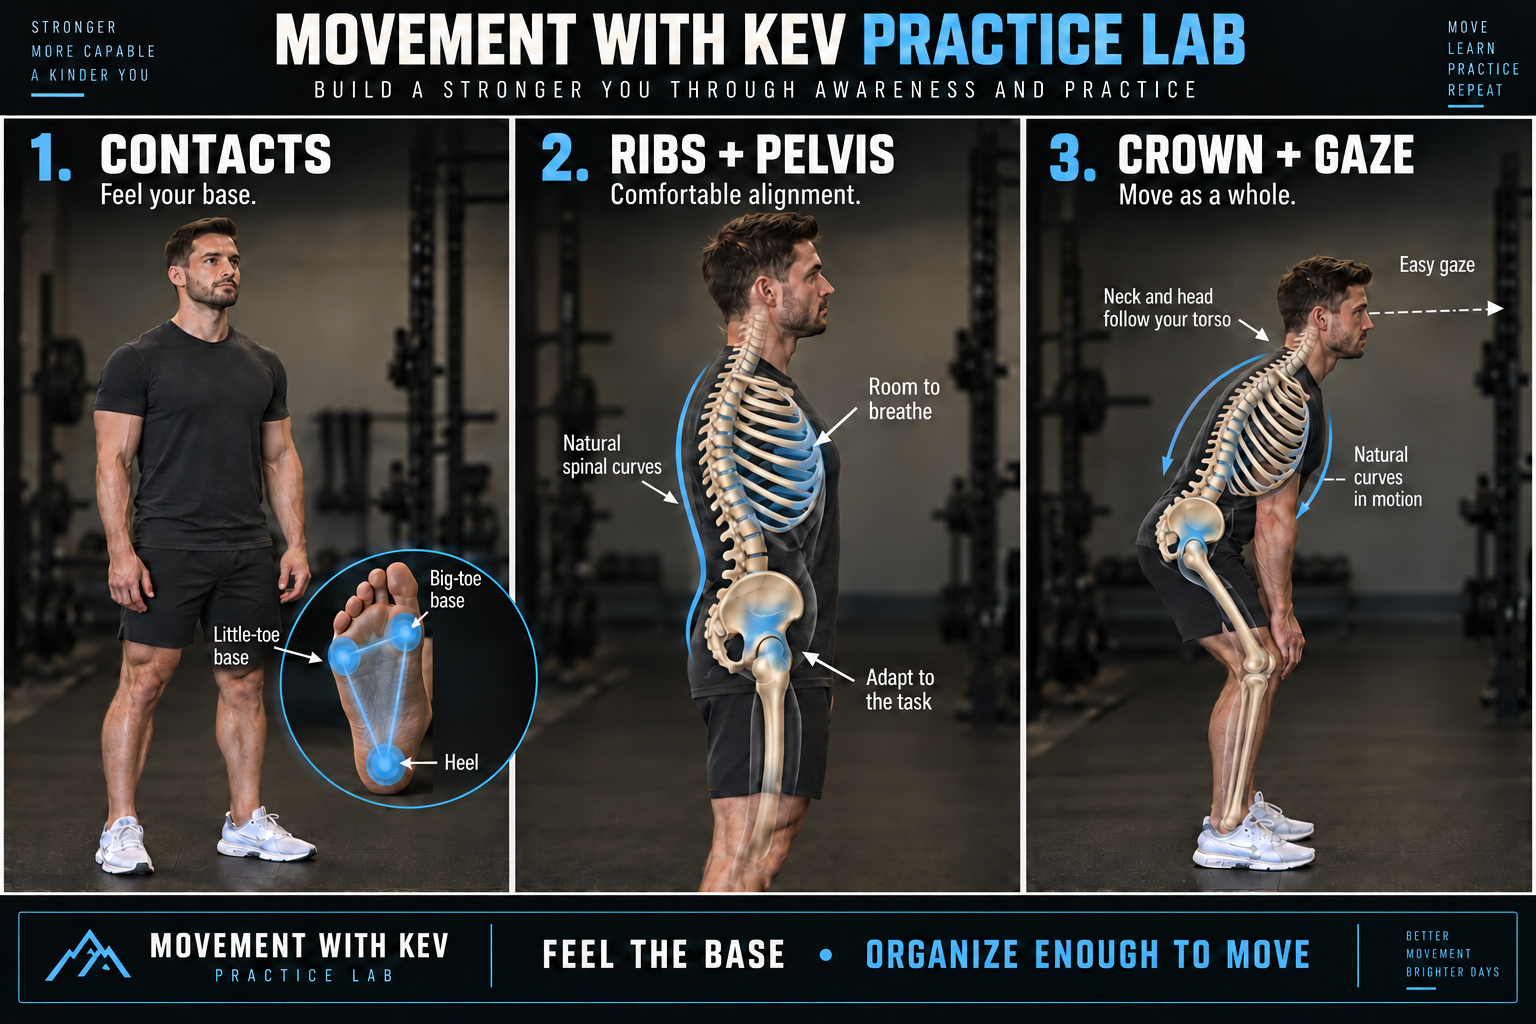
Your stack is a usable relationship between your support, pelvis, rib cage, and head. It changes with the mission: standing, reaching, hinging, and walking ask different things of the chassis.
Read from the ground up. These are teaching references, not one ideal posture to hold all day. Open full-size chart ↗
UNDERSTAND THE PARTS
Contacts → pelvis → ribs → crown
Contacts: where your body meets support. Standing, explore the heel and the bases of the big and little toes. They help you notice pressure without clawing the toes. Pressure can shift during movement; it does not need to stay equal at all three points.
Pelvis: the bony ring joining the trunk to the legs. Its position changes the starting relationship at the hips. “Find your pelvis” means finding a usable starting place—not squeezing the glutes or forcing a hard tuck.
Rib cage: the moving home for your breathing and the surface the shoulder blades travel around. Let it organize with the pelvis while keeping an easy breath available. “Ribs over pelvis” describes a relationship, not a demand to flatten the spine.
Crown and gaze: let the head follow the task with a comfortable neck. In a hinge, the trunk inclines and your gaze can drop with it. Looking straight ahead at all costs can turn a simple hinge into a neck-extension task.
CONNECT THE REFERENCES
Your stack travels with you
The spine has natural curves. A useful stack leaves options to bend, rotate, and shift weight. If holding a position makes you grip, brace continuously, or lose an easy breath, reduce the effort and reassess the task.
The rear rail: MWK’s attention reference on the back of the rib cage, between the shoulder blade’s inner border and the spine. It is a region to notice in the demonstrated setup, not a separate bone or muscle. Feeling that region does not prove that a rib moved or a tissue “released.”
Home Base is a specific technique: in the feet-on-wall 90/90 version, the pelvis rests on the surface. It is not a bridge. Use that supported position to explore the references, then check whether the experience helps your standing or movement task.
Name a baseline. Try three comfortable chair stands. Notice foot pressure, effort, and whether you hold your breath.
Find the base. Stand with support nearby if needed. Notice heel and forefoot contact without forcing an arch or pushing all your weight backward.
Organize gently. Let the pelvis and ribs settle into a position from which you can breathe. Keep the jaw and gaze easy.
Make a small move. Repeat the chair stand with the same chair, foot position, and speed. Use one cue: “Feel the base; let the chassis move.”
Compare the task. Was it easier, more repeatable, or simply different? Keep a useful cue; change an unhelpful one. Check again later.
Coach’s lens: describe what you saw—“the heel lifted” or “the breath stopped”—before suggesting why it happened.
Teach it back: does a good stack stay vertical?
No. A hinge carries the ribs and pelvis forward relative to the feet. A useful stack adapts to the task while leaving movement and breathing options available.
The arm does not move alone. The upper arm, shoulder blade, collarbone, and rib cage contribute to the task. Watch the blade in relation to the ribs—not just the hand’s destination.
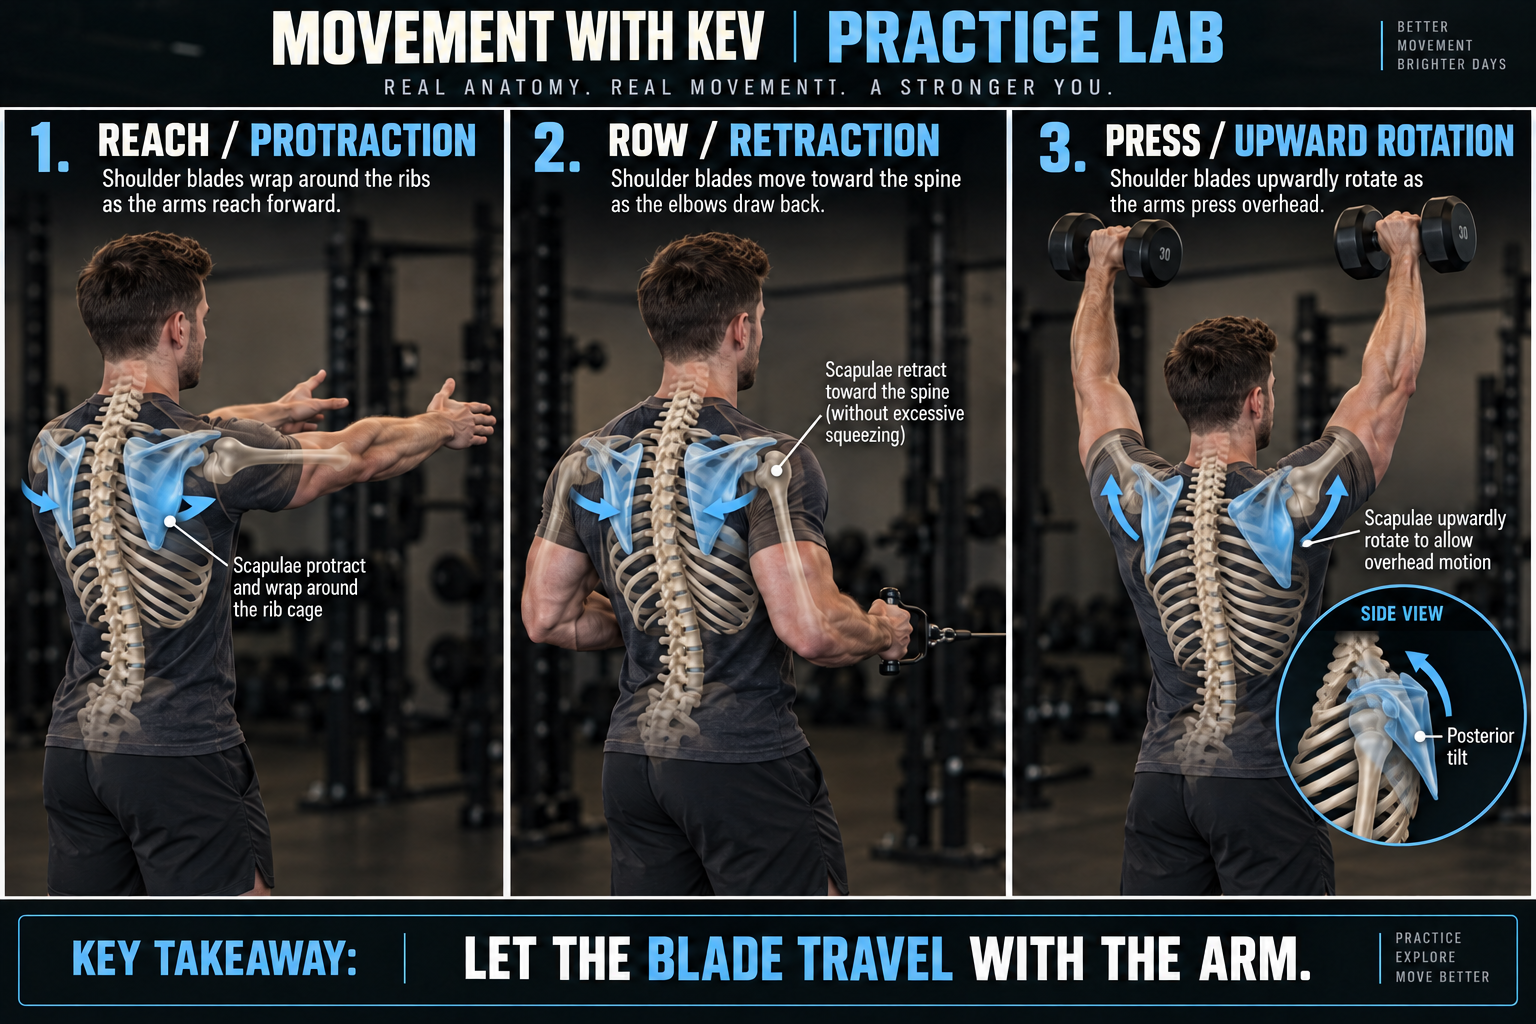
Compare the blade’s position on the rib cage. The inset uses a side view because posterior tilt cannot be explained by a back view alone. Open full-size chart ↗
UNDERSTAND THE PARTS
Blade, socket, arm, ribs
The scapula is the shoulder blade. Its inner, or medial, border lies toward the spine; its lower tip is the inferior angle. Its outer socket, the glenoid, meets the head of the upper-arm bone, the humerus.
The blade changes position on the curved rib cage as the arm moves. It is also connected to the collarbone. “Let the blade travel” means allowing this coordinated motion, rather than trying to hold the shoulder blades in one fixed position.
Protraction and retraction describe travel around the thorax and back toward the spine. Upward rotation turns the glenoid more upward as the arm elevates. Posterior tilt tips the upper blade backward relative to the thorax as the lower angle comes toward the ribs. These are different components of three-dimensional motion, and they can occur together.
KEEP THE REFERENCES SEPARATE
A hand position is not a blade measurement
Turning the palm can involve the forearm. Rotating the humerus is motion of the upper arm relative to the scapula. Moving the scapula changes the blade’s relationship to the thorax. Do not use one of these as proof of another.
In an overhead dumbbell press, elbow extension and arm elevation accompany scapular motion. The blade generally upwardly rotates and posteriorly tilts as the arm rises, but the amount and timing vary with the person and task. There is no single ratio to enforce on every repetition.
The rear rail can help direct attention to the back of the thorax. It should not become an instruction to pin the blades together or keep the shoulders pulled down during overhead work.
Explore the movement
Select a task for its motion, observation, and coaching cue.
Reach: let the blade wrap
As the hand reaches forward, the blade can travel around the ribs away from the spine. Observe whether the reach comes with blade travel or mostly from turning the whole trunk. Cue: “Let the blade follow the hand around the chassis.” Compare the same reach distance and support before and after.
Try it: the wall-supported reach
Face a wall and place both hands comfortably below shoulder height. Choose a distance where standing and breathing feel manageable.
Gently reach the wall away, allowing the shoulder blades to travel around the ribs. Keep the elbows softly extended without forcing them straight.
Return slowly. Notice the blades coming back toward the spine without a maximal pinch. Keep the movement small enough to repeat.
Retest an unloaded reach at the same height. Observe range, effort, and trunk movement separately. A smoother reach is an observation—not proof that you corrected a specific muscle.
MWK cue: “Keep your base. Let the blade travel with the arm. Leave room to breathe.”
Teach it back: should I keep the blades down and back in a press?
Holding that position throughout can work against the scapular travel that accompanies arm elevation. Let the blade move with the arm, and select a range and load you can control. A row and an overhead press need different blade behavior.
Name the two parts before naming the movement. A hip angle is a relationship between pelvis and femur. Where the whole body faces is a different reference.
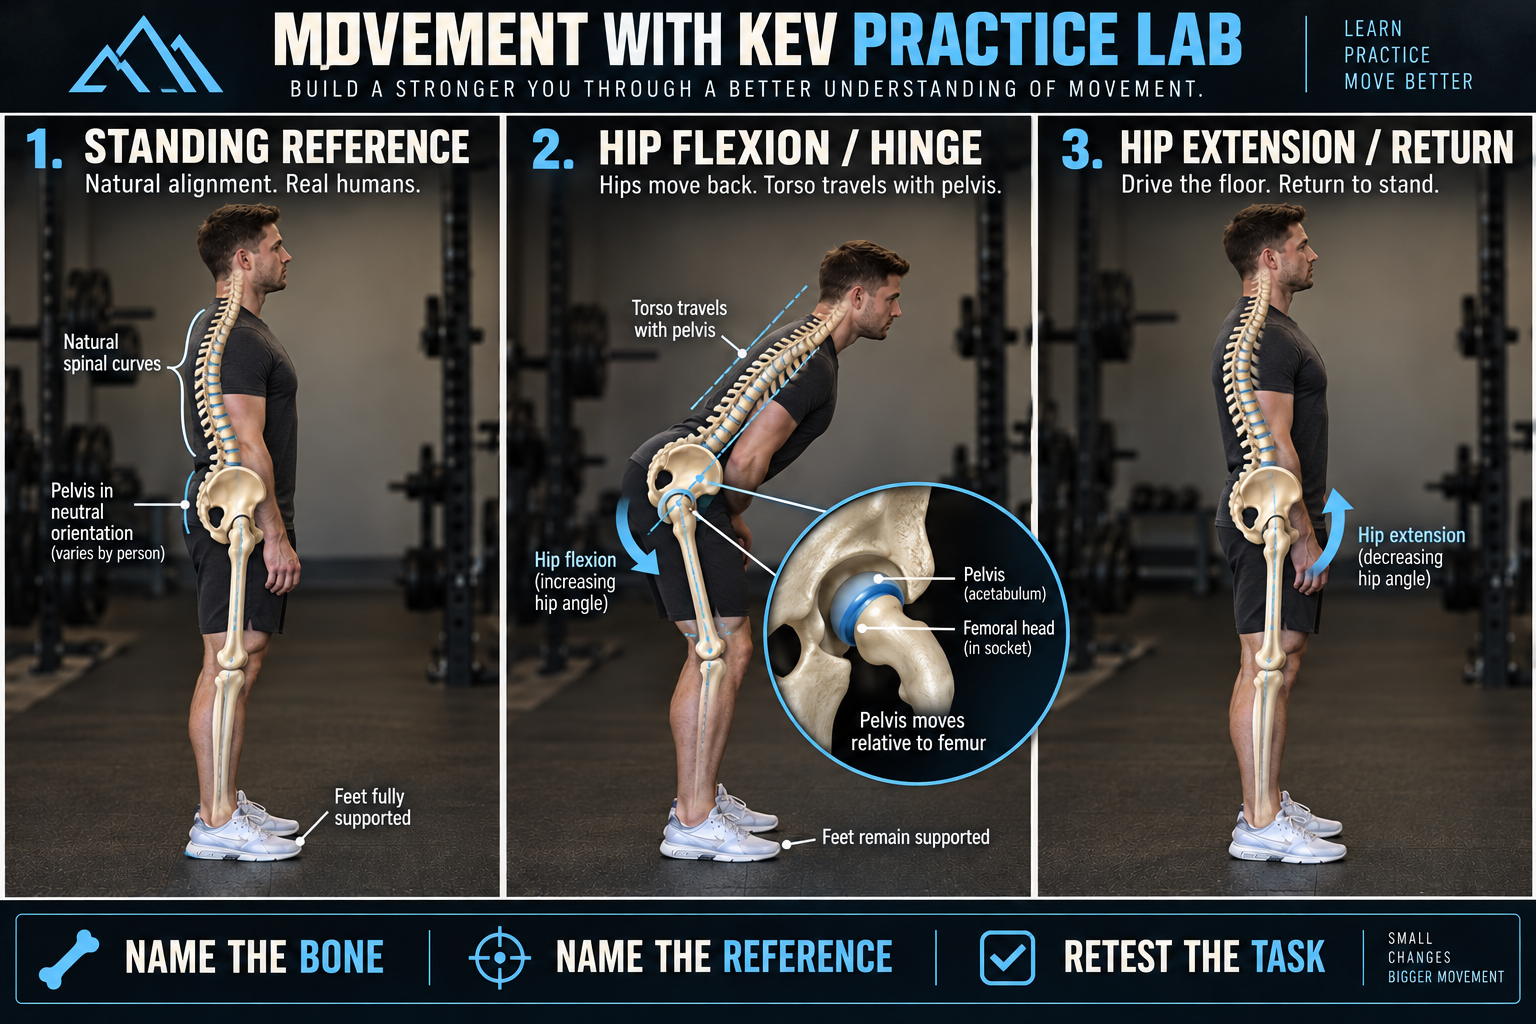
During a hinge, the pelvis and trunk incline relative to the thighs. Returning reduces hip flexion; the feet provide the support for the task. Open full-size chart ↗
UNDERSTAND THE PARTS
The socket and the thigh
The acetabulum is the socket in the pelvis. The rounded head of the femur, or thigh bone, fits into it. Motion at the hip describes how these two bones change their relationship.
Femur on pelvis: bring a knee toward the chest while keeping the pelvis relatively still. The thigh moves toward the trunk—hip flexion.
Pelvis on femur: in a standing hinge, the pelvis and torso incline over the supporting thighs. This also produces hip flexion even though the movement looks different. The return toward standing uses hip extension.
The knees can bend as needed. The pelvis and trunk travel together as a teaching emphasis, but neither is literally locked. A hinge is not a demand to freeze the spine or reach a prescribed depth.
MOTION VS ORIENTATION
Turning the chassis is a different question
Imagine turning your feet, pelvis, and torso to face another wall. You changed your orientation in the room. That observation alone does not tell us how much rotation happened at either hip.
To describe hip internal or external rotation, follow the femur relative to the pelvis. To describe pelvic orientation, state whether you mean relative to the room, the feet, or the femur. A foot pointing outward does not, on its own, measure hip rotation.
A pelvic tilt describes the pelvis changing orientation. It does not independently tell you the full hip angle: the thigh’s position also matters. Likewise, the head’s distance from the floor does not tell you how much motion came from the hips, knees, or spine.
Choose the reference
Standing: establish your comparison
Notice the feet, pelvis, and thighs before moving. Standing is your starting reference, not a posture score. Record the stance, support, and intended depth so the retest answers the same question.
Try it: send the hips back, then return
Stand with a comfortable stance and soft knees. Use a stable support if needed. Notice heel and forefoot contact.
Make a small hinge by sending the hips backward while the trunk inclines. Let the head follow the trunk instead of lifting the chin to keep looking straight ahead.
Stop at a depth you can control and reverse. Return to standing without finishing by thrusting the pelvis forward or leaning the ribs backward.
Repeat the same depth and speed. Compare whether the motion feels easier and whether the feet stay available as support. Reduce the range if the cue makes you grip or strain.
MWK cue: “Find the foot. Let the hip carry the task. Bring the chassis back over your base.”
Where occupancy fits
Enter, use, and leave a side. In MWK language, occupancy means more than parking body weight over one foot. Can you accept support there, perform a manageable task, and move away again? A supported weight shift can explore that question. A still photo or an apparent side preference cannot decide which side needs training.
Teach it back: does turning left prove left hip rotation?
No. First identify how the pelvis and each femur moved relative to one another. Turning left describes the overall direction; it does not quantify motion at either hip.
Use this at Day 7 or Day 14, or whenever a practice needs review. Repeat the same baseline and describe the response. A date or a quiz score alone never clears the next demand.
This is a reflection tool, not medical clearance. Nothing here is uploaded or saved to your account. Stop a trial that brings new or worsening symptoms and seek appropriate help.
READ / TRY / TEACH BACK
Three short checks for understanding.
Choose your answers, then check the explanations. Retry any question and return to the lesson when needed. These quizzes support learning; they do not determine readiness to progress.
MWK synthesis informed by the supplied biomechanics course references and Master Coaching Manual. The diagrams and quiz wording are original. Course expansion and side-bias models are teaching interpretations rather than guarantees of a tissue change.