1. Start tall
Hips / pelvis Begin with supported feet and a small knee bend. The pelvis is free to tip at the hips.
Scapula / arms With arms hanging, the scapulae rest against the rib cage; avoid a forced pinch or shrug.
 MOVEMENT
Lower body · hip-dominant pull
Load hip motion while managing the trunk and the load.
See it. Then coach it.
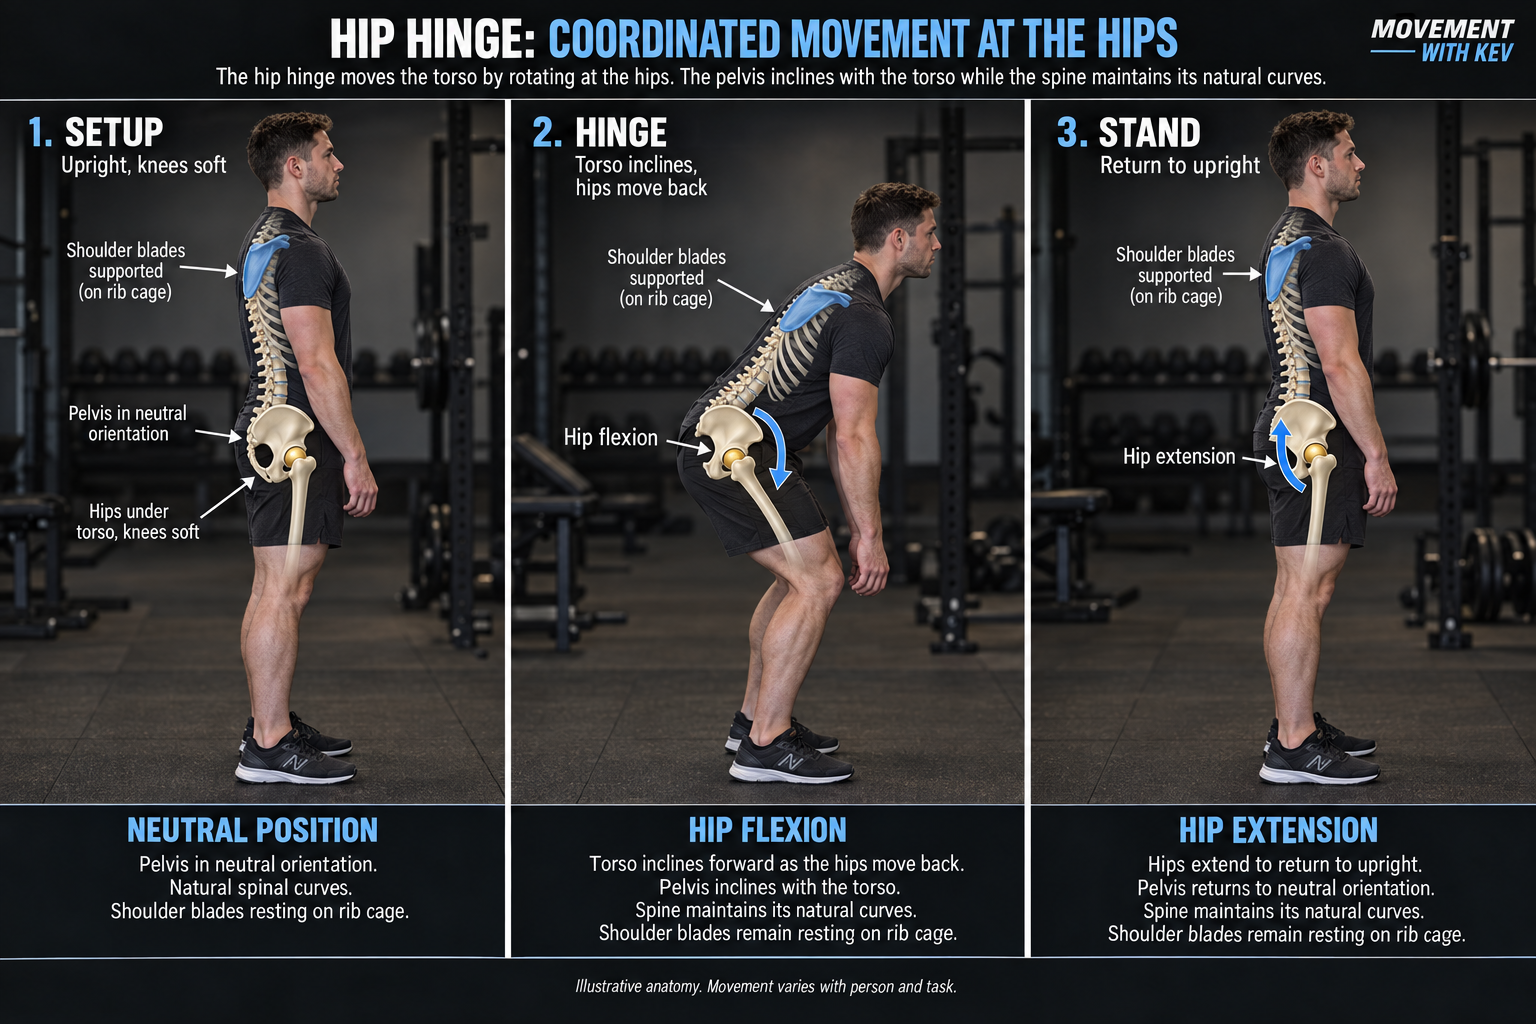
Read the chart · hips + shoulder blades
Scapula means shoulder blade. Flexion closes a joint angle; extension opens it. Protraction carries the shoulder blade around the ribs; retraction brings it toward the spine.
Hips / pelvis Begin with supported feet and a small knee bend. The pelvis is free to tip at the hips.
Scapula / arms With arms hanging, the scapulae rest against the rib cage; avoid a forced pinch or shrug.
Hips / pelvis Hip flexion increases as the pelvis and torso incline and the hips move back. Knee bend remains modest in this example.
Scapula / arms The shoulder girdle travels with the inclined torso. Supporting the arms is different from actively rowing or pulling the scapulae back.
Hips / pelvis Hip extension brings the pelvis and torso back upright. Finish without adding a backward lean.
Scapula / arms Keep the arms quiet and let the shoulder blades follow the torso; they do not create the hip extension.
These are typical movement descriptions for the variation shown. A visible landmark does not reveal exact joint motion or establish a diagnosis. Use the chart to explain the task, then compare control and repeatability.
The hips flex as the pelvis and trunk tip forward relative to the thighs. The knees usually bend less than in a squat. Hip extension returns the body to standing.
Setup reference: the MWK Stacking Guide
Follow the pelvis and rib cage together. A hinge is not simply an instruction to arch the lower back; choose a range the athlete can control.
Raise the starting height to match the available range.
Use the wall behind the hips as a simple direction cue.
Use the back foot for support while biasing the front leg.
Use as the programmed deadlift pattern or an accessory. A few easy unloaded rehearsals can prepare the working sets.
For an initial comparison, change one feature and preserve the planned training volume where practical. Adjust load to the new variation; the same weight can represent a different demand.
Reaching farther by losing control of the trunk, drifting onto the toes, or letting the load move away changes the task. Shorten the range or raise the load.
Repeat the same unloaded hinge or starting height. Compare balance, controlled hip travel, and effort at the same load.
An immediate change is feedback, not proof of a correction. Check repeatability and the athlete’s response at the next session.
Baseline / task:
One change:
Immediate response:
Next-session response:
Movement education for coaches and athletes. These are general teaching examples, not an individualized rehabilitation plan. Stop a trial that produces new or worsening symptoms. MWK interpretation is labeled separately from the joint-action description.
Study basis: the supplied Week 9 lower-body exercise-selection notes, Week 10 upper-body exercise-selection notes, and MWK Scapular Mechanics & Reaches. Summarized for practical teaching; exercise responses vary by person and task.