
DOCUMENT LIBRARY
Open the original PDF above, or read the illustrated study module below.
YOUR OBSERVATION ROUTE
Observation checklist
Open a zone to see its diagram and field notes. Blue identifies what to observe, gold adds context, and green marks the question to test.
01HOME BASEWhere does the chassis live?
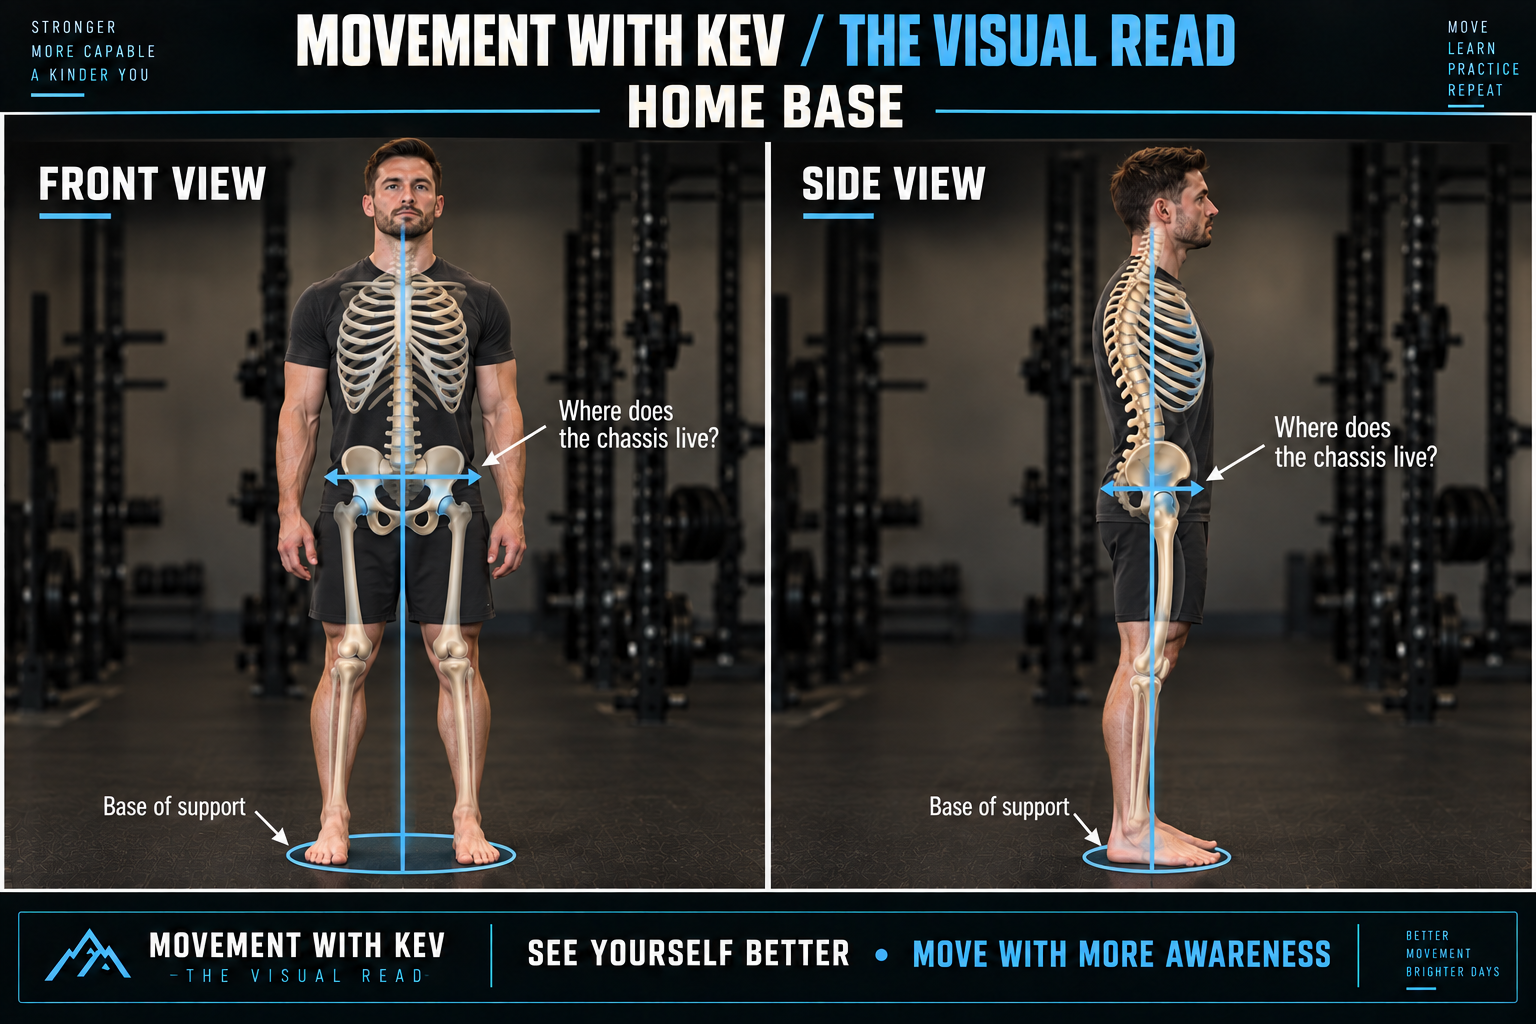
HOME BASE / FRONT-VIEW COMPARISON
Lateral pelvic tilt and shoulder height
Compare shoulder height and pelvic height together. In this example, the shoulder above the higher side of the pelvis sits lower, while the opposite shoulder sits higher. Gold markers follow the shoulders and blue markers follow the pelvis.
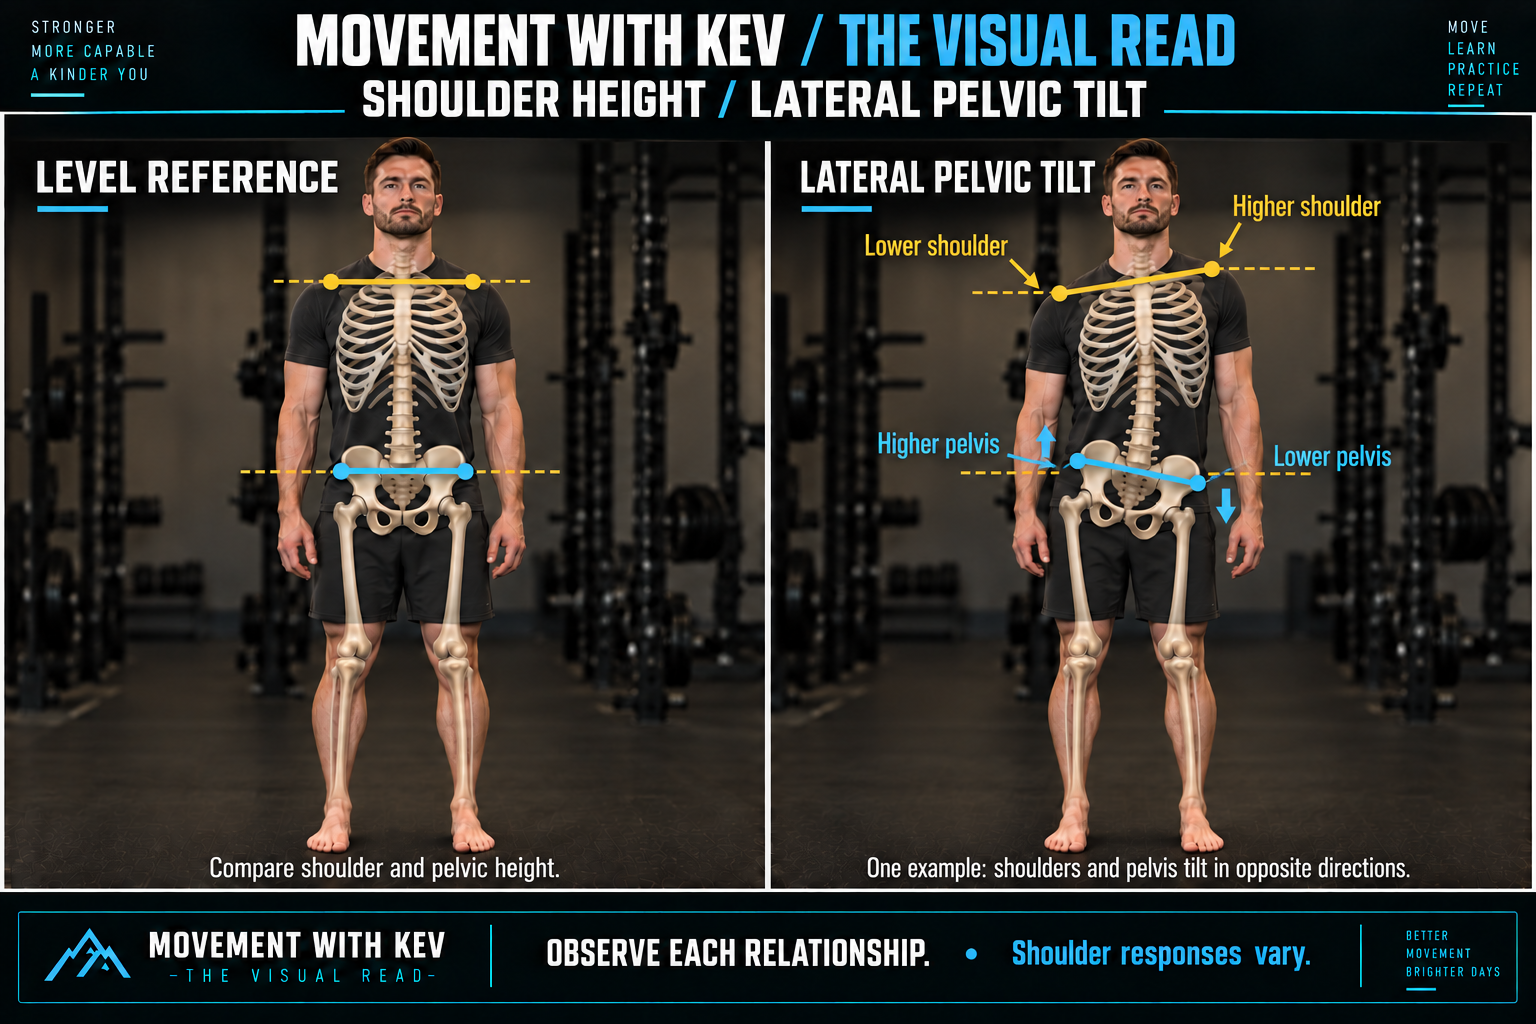
This is one example of shoulders and pelvis tilting in opposite directions. Shoulder responses vary, so observe each relationship separately. Describe what appears higher or lower from a level front view, then compare what happens during movement.
HOME BASE / SIDE-VIEW COMPARISON
Where is the pelvis starting?
People arrive in a range of positions. Compare anterior and posterior pelvic tilt alongside the neutral reference, then describe what you see in the person in front of you.
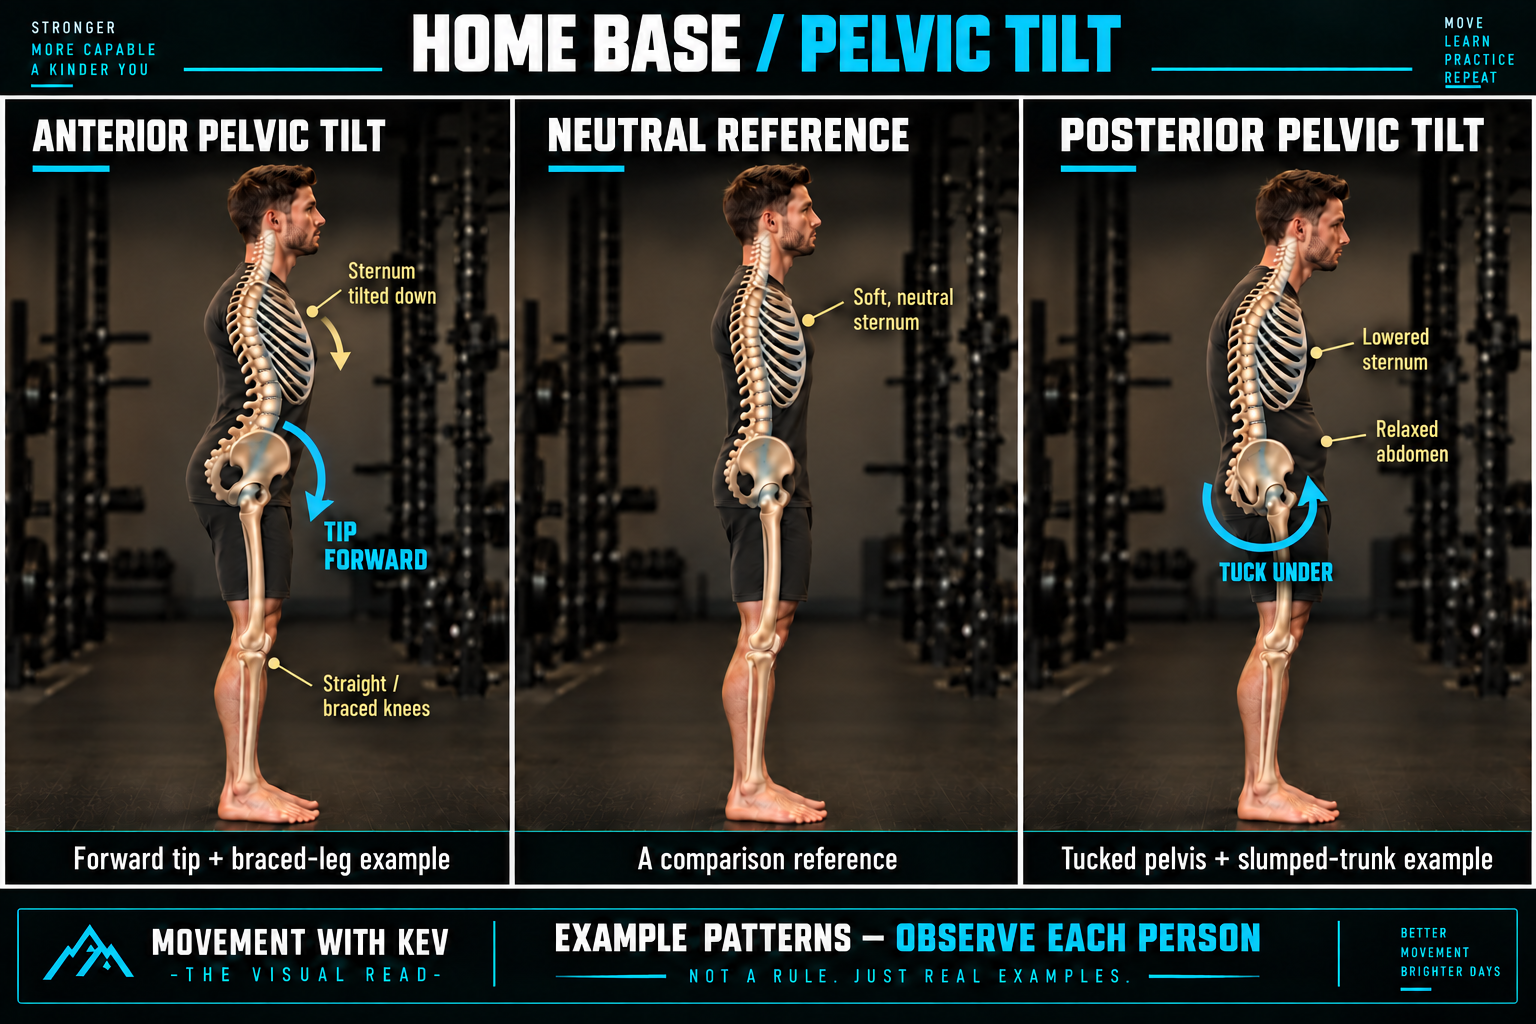
Anterior pelvic tilt
Follow the arrow forward and down: the front of the pelvis tips down relative to the back. This example also shows straight, braced-looking knees and a sternum tilted down toward the abdomen. The gold arrow highlights the sternum’s direction.
Neutral reference
A comparison point with a soft, neutral sternum and an easy, relaxed chest. Here, “soft” means unbraced. Let the chest rest comfortably over the pelvis; this is not a position everyone must hold.
Posterior pelvic tilt
Follow the arrow underneath and up at the front: the tailbone tucks under as the front of the pelvis rises. This example shows a relaxed abdomen and a lowered sternum, with less space between the chest and pelvis.
Pelvic tilt describes rotation of the pelvis. A whole-body shift forward or back is a separate observation. The leg and trunk positions shown are example combinations, not automatic effects of pelvic tilt. Observe the pelvis, knees, abdomen, and sternum separately, then explore movement and retest.
LOOK FORCentered / right / left / forward / back
01 / What I see
Start with the whole person. Notice their position over the feet from the front and side before focusing on a single joint.
02 / Keep it in context
Does standing look easy or effortful? Describe an apparent shift without assuming where pressure is greatest.
03 / Say it in MWK language
“Your trunk appears shifted toward your right foot.”
04 / Test → retest
Try a small supported weight shift, then return to the same stance. Ask what they feel under each foot.
KEEP THIS: Here, Home Base means the starting visual reference. The 90/90 breathing technique is a separate application.
02HORIZONRead the head, eyes, and ears.
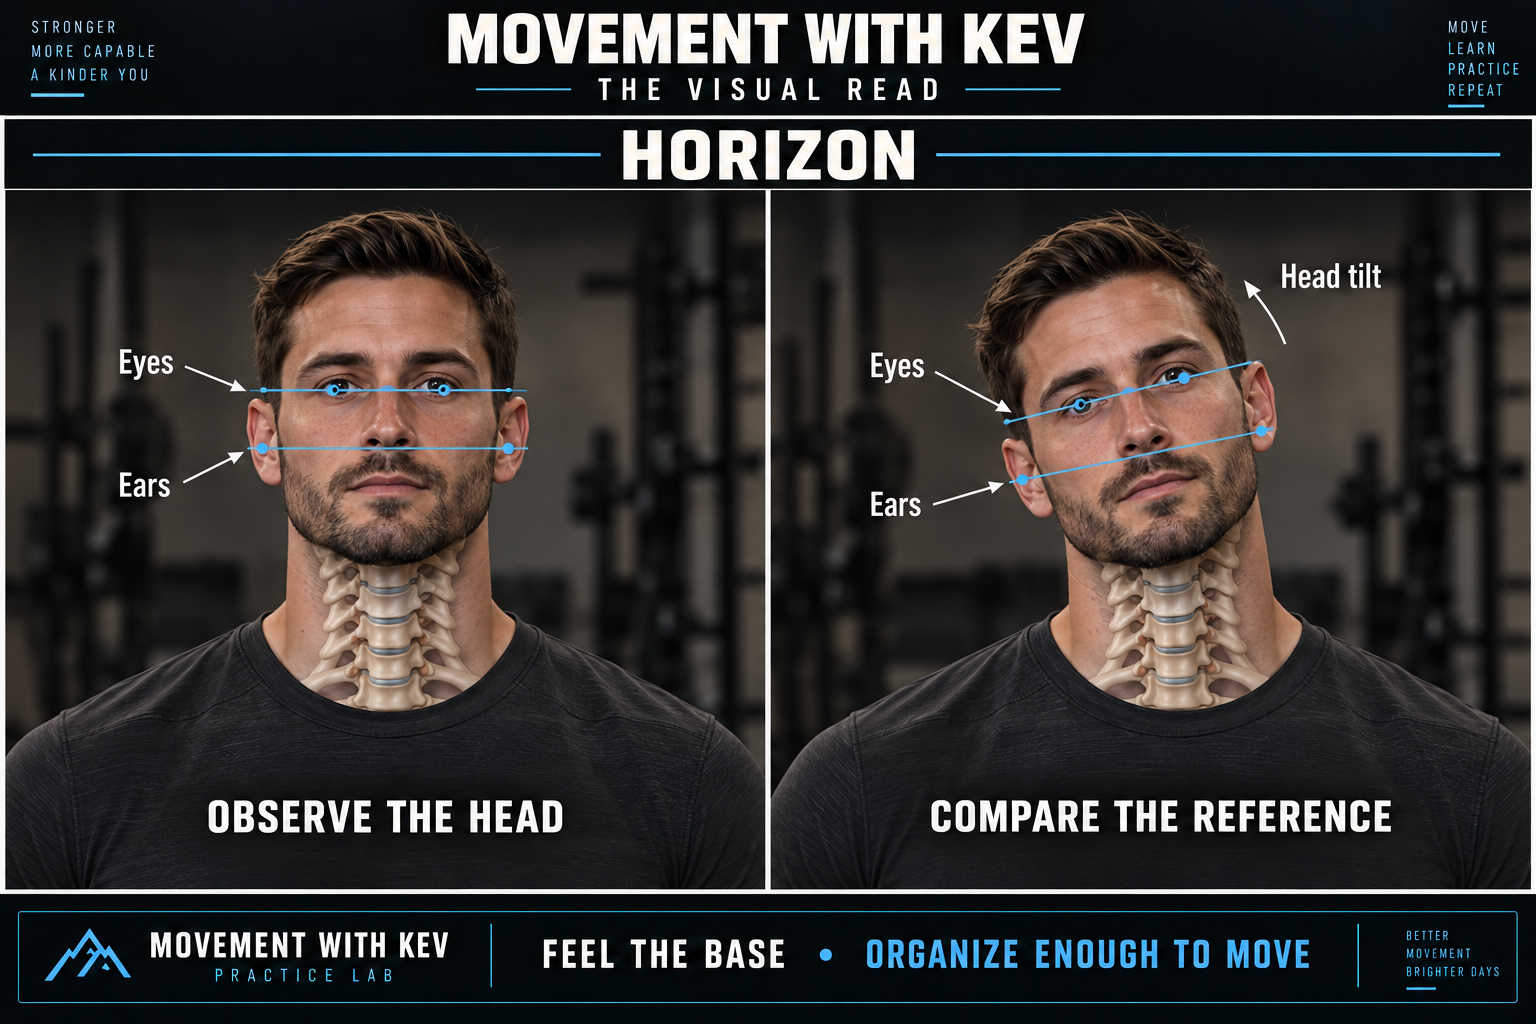
LOOK FOREye line / ear line / head tilt
01 / What I see
Compare the eye and ear lines from a level front view. Notice whether the head appears side-bent.
02 / Keep it in context
Camera tilt, head turn, hair, and natural facial differences can affect the view. Compare like with like.
03 / Say it in MWK language
“Your head appears tilted slightly to the left in this view.”
04 / Test → retest
Invite an easy look left and right, then return to a comfortable gaze. Check whether the original appearance persists.
KEEP THIS: A visible difference is a clue to explore, not a reason to force the head level.
03HEAD — SIDEWhere is the head relative to the trunk?
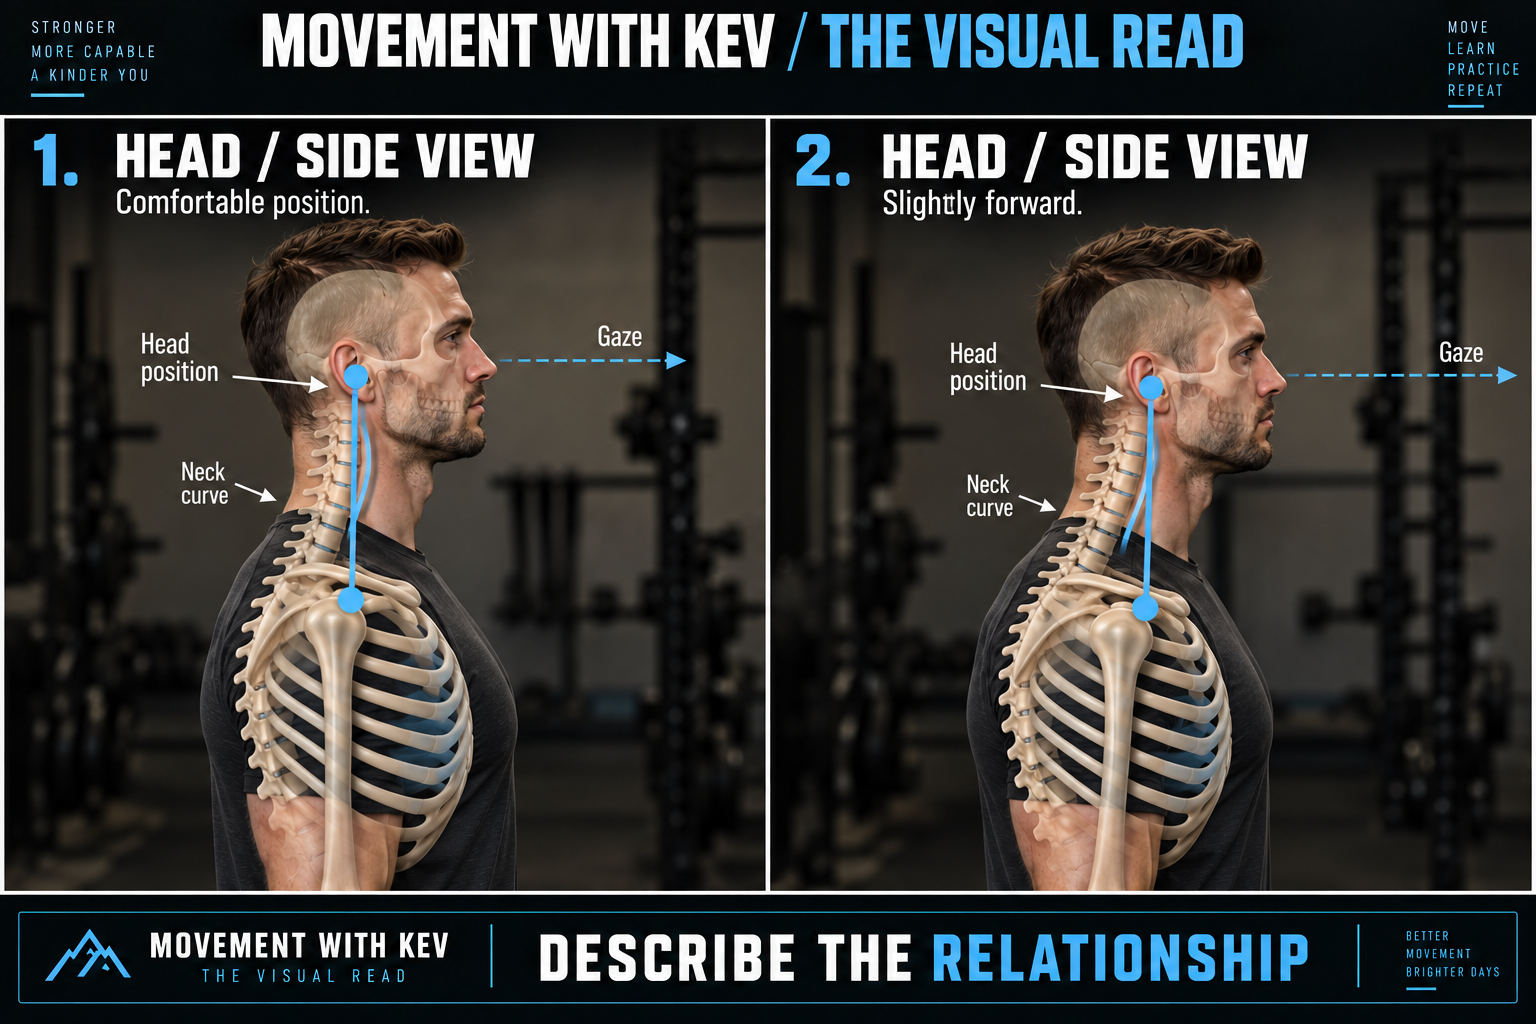
HEAD / SIDE-VIEW COMPARISON
Forward head position
Compare the comfortable reference with a more pronounced forward head position. The shoulder reference stays visible so you can see how far forward the head sits relative to the upper trunk. The gold markers add the sternum as a second reference: this forward head example shows a lowered sternum and a chest angled down toward the abdomen.
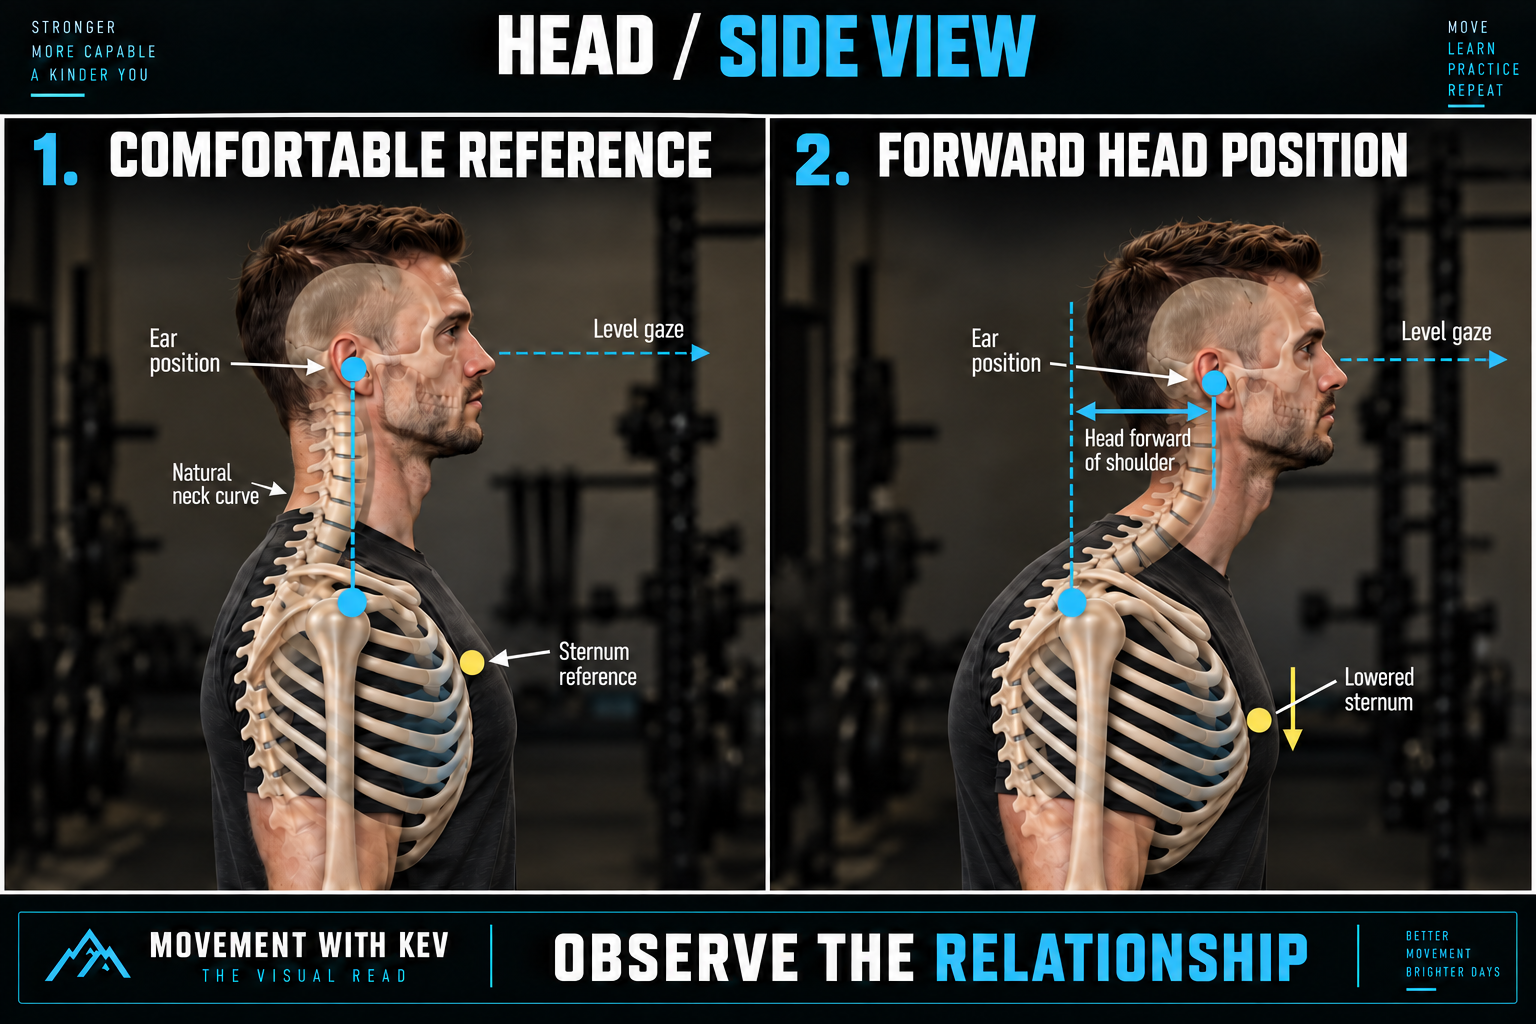
Compare ear → shoulder → sternum. Notice the sternum’s height and direction as well as how far forward the head sits. This chart shows one combination; observe these landmarks separately rather than assuming every forward head position includes a lowered sternum. Then notice how the relationship changes with the task.
LOOK FORHead position / neck curve / gaze / sternum position
01 / What I see
From a consistent side view, notice head position, the visible neck contour, and where the person looks.
02 / Keep it in context
An external view does not measure individual vertebrae or locate the body’s center of gravity. Use the overlay to identify regions.
03 / Say it in MWK language
“The head sits farther forward relative to the upper trunk in this position.”
04 / Test → retest
Compare comfortable sitting and standing, or a small reach with easy gaze. Keep the viewing angle consistent.
KEEP THIS: Leave natural neck curves available. Avoid turning observation into a hard chin-tuck instruction.
04STACKRead the relationships.
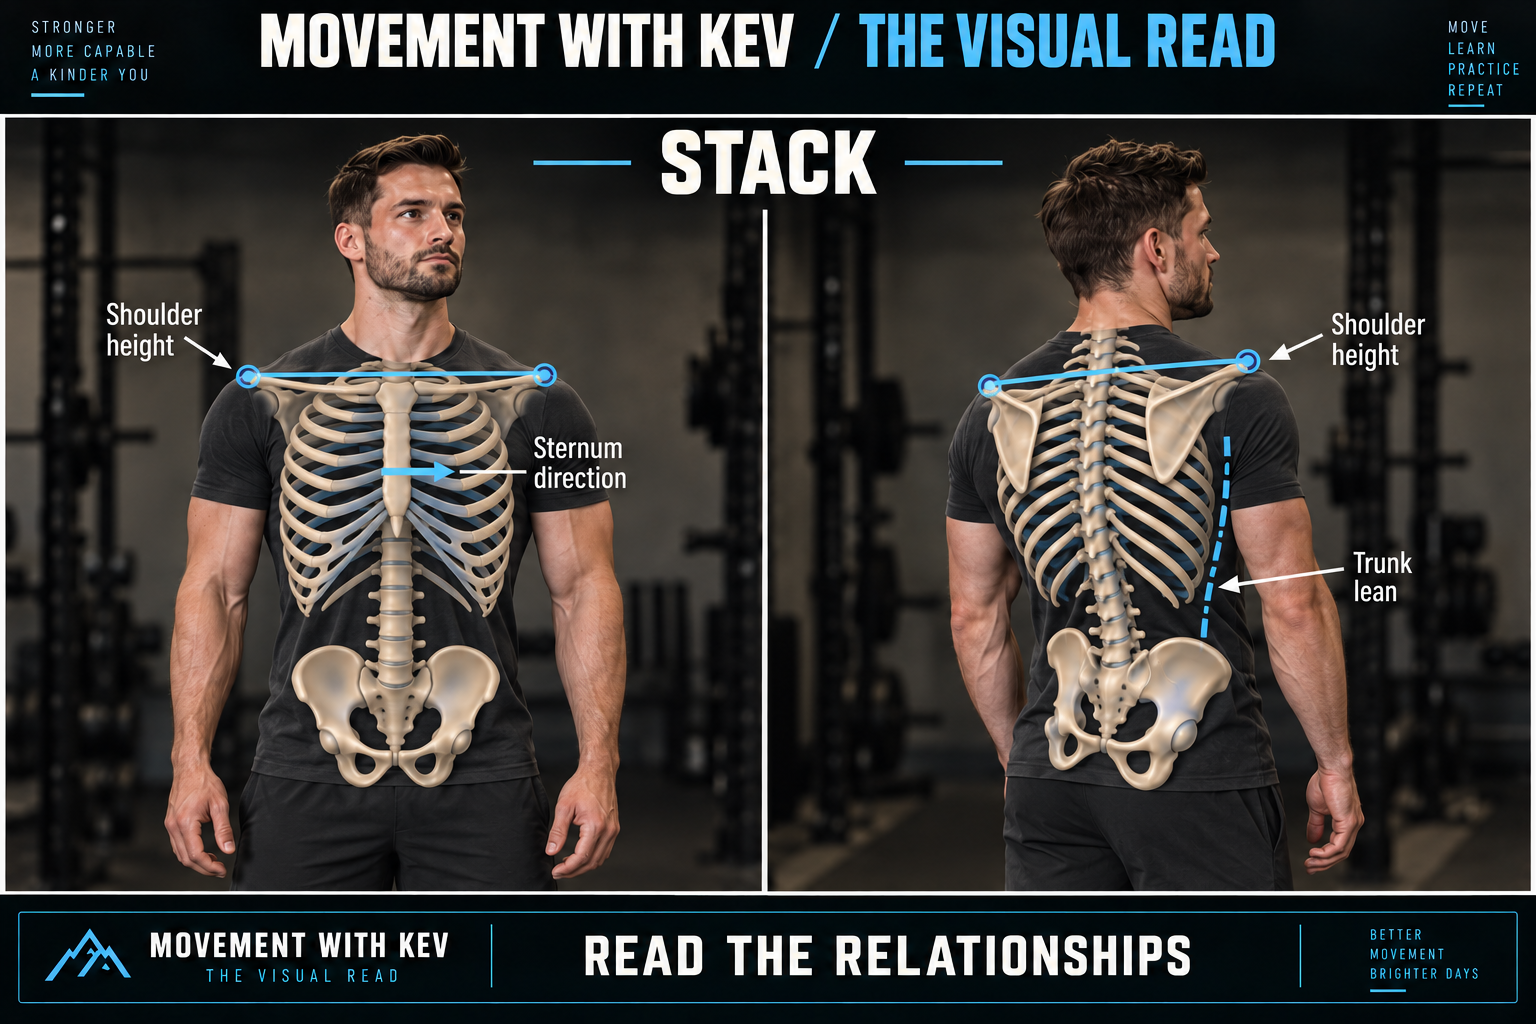
LOOK FORShoulder height / trunk lean / sternum direction
01 / What I see
Compare the shoulders, then the trunk and sternum, then their relationship to the pelvis. Look at the whole arrangement.
02 / Keep it in context
A lower shoulder alone cannot establish which way the rib cage rotated. Name each observation separately.
03 / Say it in MWK language
“The right shoulder appears lower; the sternum appears turned slightly right.”
04 / Test → retest
Use one comfortable reach and return to the original stance. Compare shoulder position and trunk movement separately.
KEEP THIS: Stack is adaptable. The aim is a useful starting relationship, not a rigid vertical line.
05RIB CAGENotice position. Watch breathing.
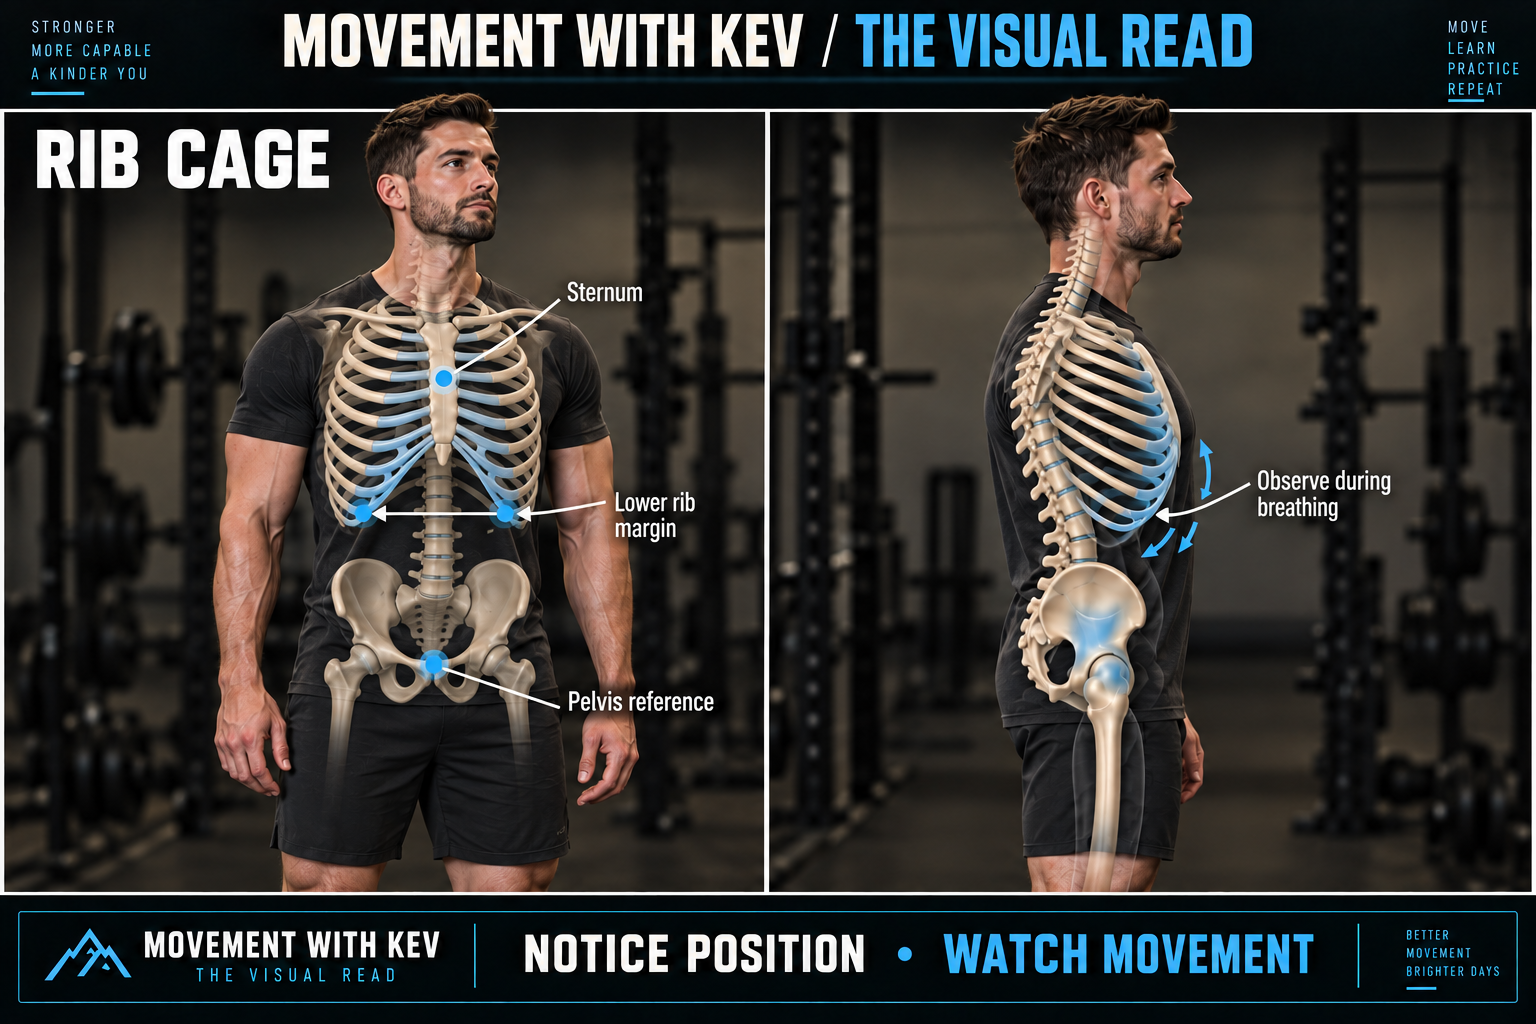
LOOK FORLower rib margins / sternum / pelvis reference
01 / What I see
Notice the outline of the lower ribs and the sternum’s orientation in relation to the pelvis. Then observe a few ordinary breaths.
02 / Keep it in context
Visible rib prominence and a feeling of expansion do not independently prove a restriction or a particular tissue change.
03 / Say it in MWK language
“The lower rib margin is more prominent on this side from this view.”
04 / Test → retest
Change one support or reach position. Compare ease of breathing and the original movement task afterward.
KEEP THIS: Ask where breathing feels available without demanding a bigger breath or pressing the ribs down.
06CENTERPelvis relative to what?

LOOK FORPelvic height / lean / tilt / position over feet
01 / What I see
From the front, compare the apparent height and location of the pelvis. From the side, notice its orientation and relationship to the trunk and feet.
02 / Keep it in context
Clothing and camera angle can obscure landmarks. A visual hip-height difference is not a leg-length measurement.
03 / Say it in MWK language
“The pelvis appears shifted left relative to the feet.”
04 / Test → retest
Try a small supported shift or hinge, then return. Observe whether the person can enter and leave support on each side.
KEEP THIS: Pelvic orientation in the room and hip motion between pelvis and femur are different descriptions.
07KNEESRead the still view, then the movement.

LOOK FORHeight / apparent direction / position relative to hips
01 / What I see
Compare the visible kneecap direction and knee position from the front. From the side, note whether the knees sit ahead of or behind the hips.
02 / Keep it in context
Apparent knee direction does not isolate femoral or tibial rotation. Foot position and viewing angle also change the picture.
03 / Say it in MWK language
“The right knee appears to point farther outward in this stance.”
04 / Test → retest
Observe a small comfortable knee bend or chair stand using the same stance. Describe the path without forcing a preset alignment.
KEEP THIS: A still image is a starting question. Watch what changes when the task changes.
08GROUND — FRONTSee the foot. Ask about contact.
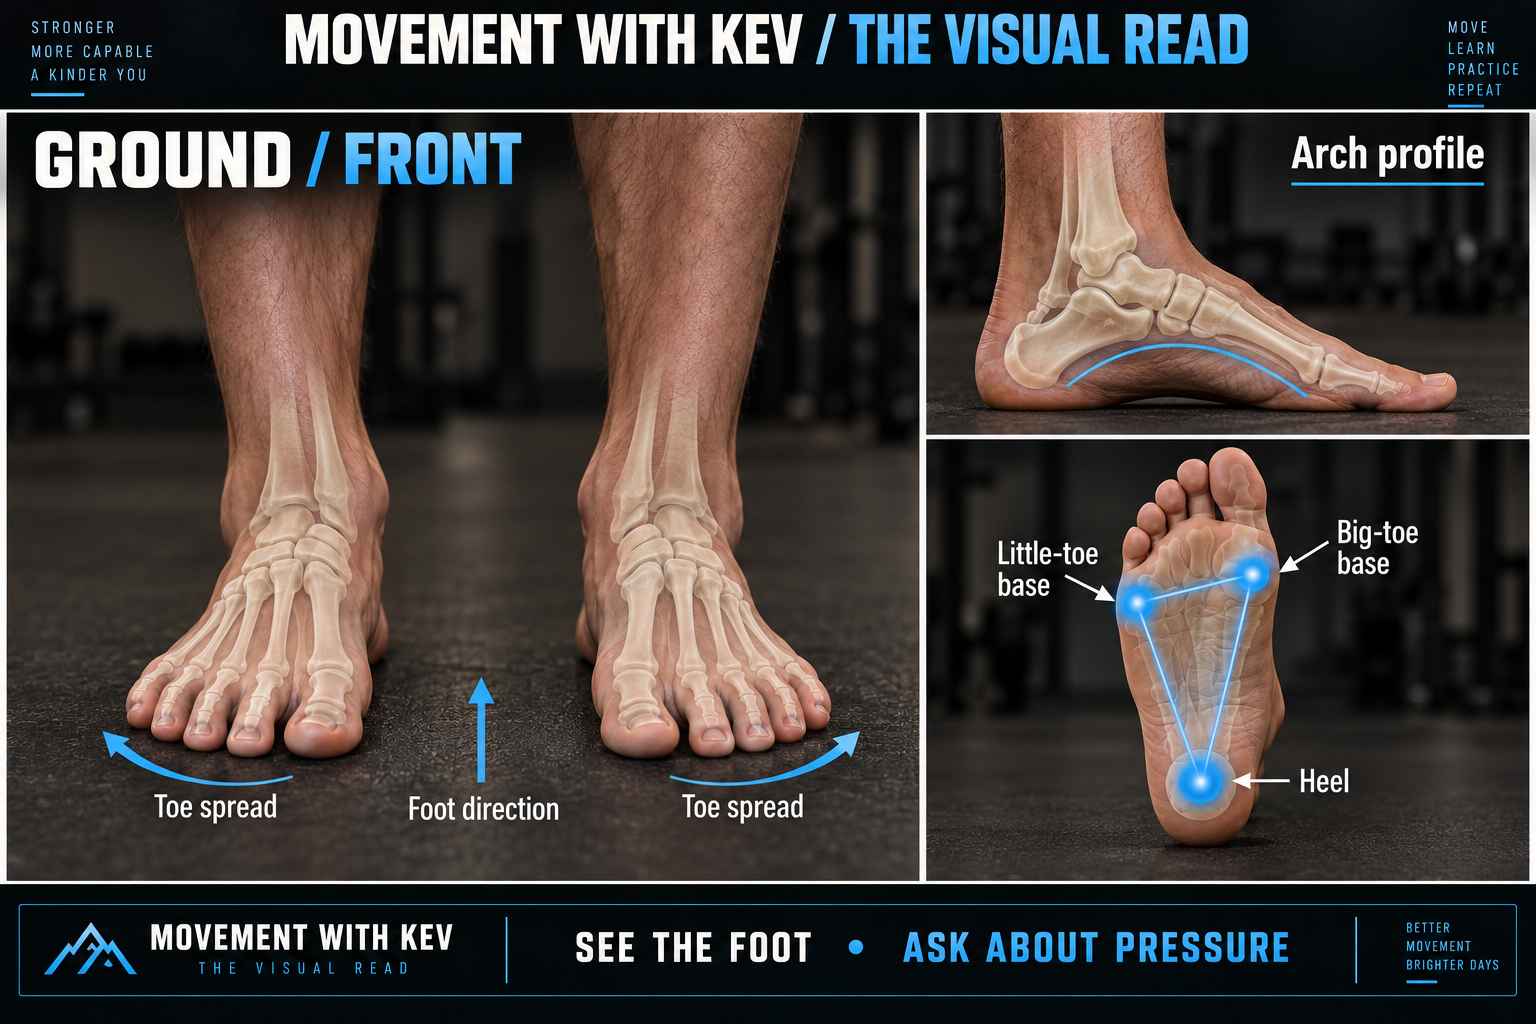
LOOK FORToe spread / foot direction / arch profile
01 / What I see
Look at toe spacing and foot direction from the front. Use a side view for the arch profile; the illustration includes an inset for that reason.
02 / Keep it in context
Appearance does not measure pressure. Ask the person what they feel under the heel and forefoot instead of assigning weight distribution from a photo.
03 / Say it in MWK language
“The left foot points farther outward; the right arch looks higher from the side.”
04 / Test → retest
Compare a small supported weight shift. Can the person sense the heel, big-toe base, and little-toe base without gripping?
KEEP THIS: Contact points are references. They do not need equal pressure throughout every movement.
09GROUND — REARWatch how the heel meets the ground.
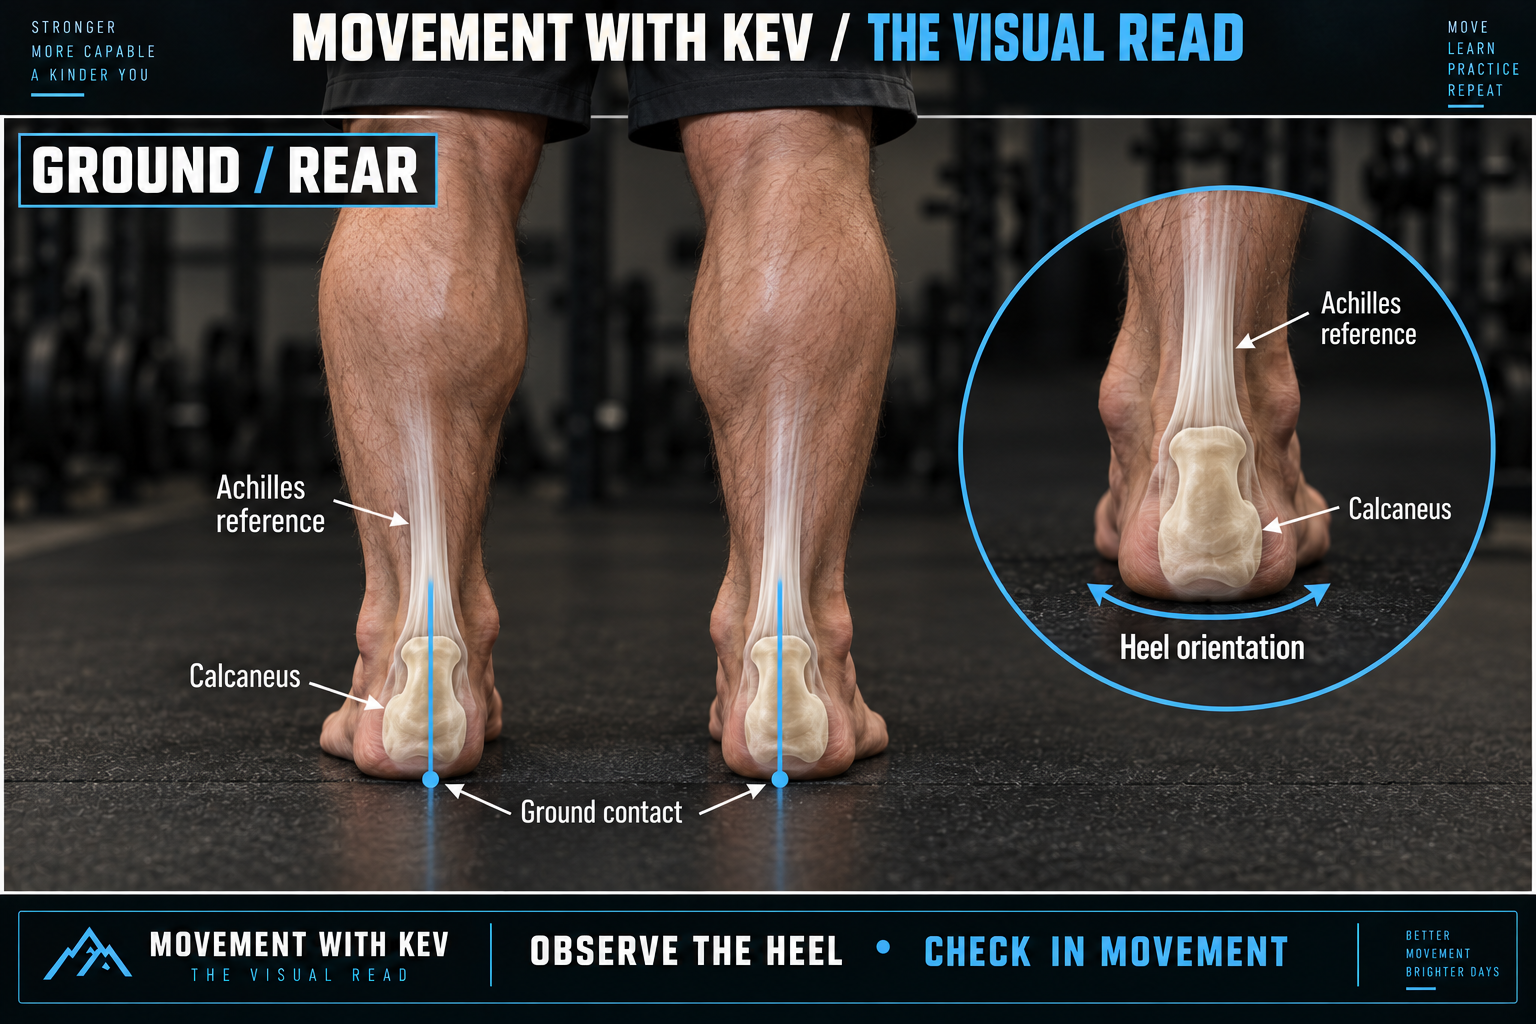
LOOK FORHeel orientation / Achilles reference / contact
01 / What I see
From behind, compare the visible heel contours and their orientation to the floor. The calcaneus is the heel bone beneath the soft tissue.
02 / Keep it in context
Heel inversion and eversion describe one component of motion. A rear view alone cannot measure the full three-dimensional pronation or supination pattern.
03 / Say it in MWK language
“The heel appears tilted relative to the ground in this view.”
04 / Test → retest
Observe the same rear view during a small supported shift or heel raise, if comfortable. Compare the motion and the person’s reported contact.
KEEP THIS: Avoid calling a foot collapsed. Describe what you see, then test a useful question.
THE MWK WORK ORDER
See the person before choosing the drill.
POSITION → CONTACTS → STACK → ACTIVATE → EXECUTE → EXPAND / COMPRESS → BREATHE → RETEST
Start with a position they can own.
Find useful support, organize enough for the task, and use the minimum effort needed. Let breathing remain part of the position.
Return to the meaningful task.
Record what changed. If nothing changed, reconsider the hypothesis and choose a clearer experiment.
MWK RULE: A photo gives us clues—not a diagnosis.
Record a checkpointRead the original document text
Text reproduced from the uploaded document. This text view does not reproduce original illustrations, color coding, or page layout. Use the document links above to view the original layout. Table columns in the extracted text may not retain their relationships.
Document text
Educational study material. Not medical diagnosis, treatment, or individualized exercise clearance.