KNOW YOUR CHASSIS / OPEN STUDY LIBRARY
See the setup.
Find your starting point.
Nine illustrated movement self-assessments. Work through one test at a time, keep the setup repeatable, and record the first change.
Shoulder Internal Rotation
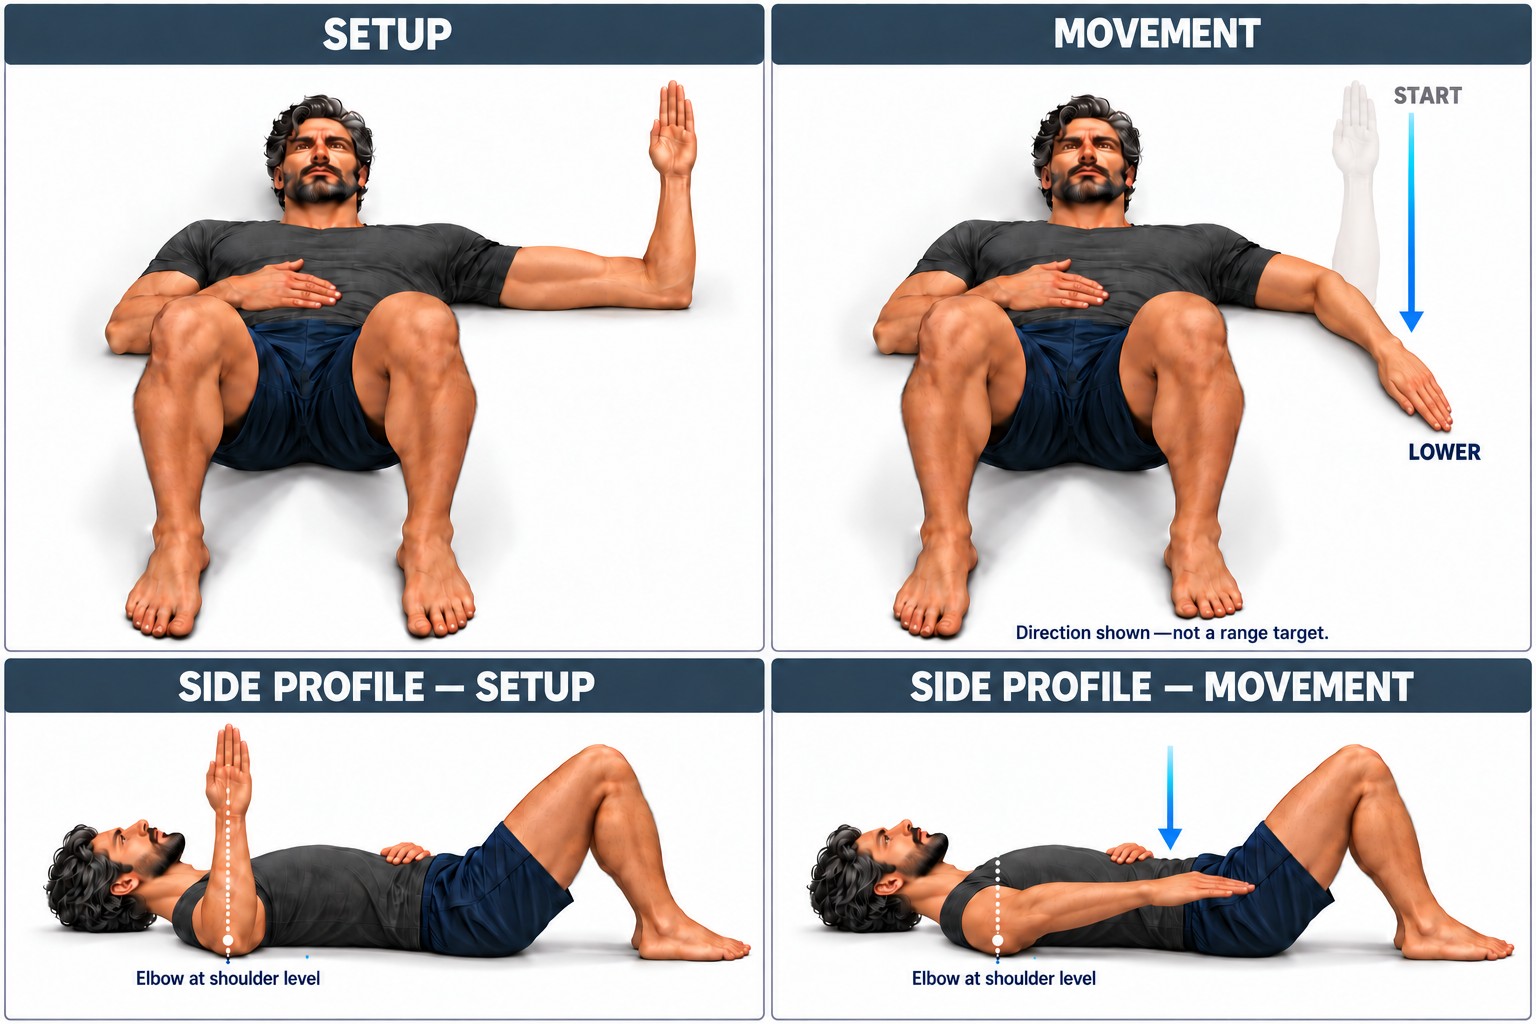
Set up & move
Lie on your back with your knees bent and feet on the floor. Bring the testing upper arm out to shoulder height and bend the elbow to ninety degrees so your fist points toward the ceiling. Rest your other hand lightly on your lower ribs. Keep the testing elbow in place. Let the forearm move slowly toward the floor toward your feet, keeping the wrist straight. Stop when the tested shoulder begins to lift, your ribs flare, your back extends, the elbow changes position, or you feel restriction or discomfort. Do not force the hand toward the floor. Record the clean range and first compensation, then repeat on the other side.
Keep these contacts
- Upper arm remains at shoulder height.
- Elbow stays in its original position.
- Back and lower ribs remain quiet.
- Tested shoulder stays in contact with the floor.
- Wrist remains aligned with the forearm.
Stop when the setup changes
- Tested shoulder lifts to gain range.
- Elbow slides or upper arm changes angle.
- Ribs flare or back arches.
- Hand is pushed down through discomfort.
Left · Right · First change in position · Comfort / notes
Open this test in the PDF ↗Shoulder External Rotation
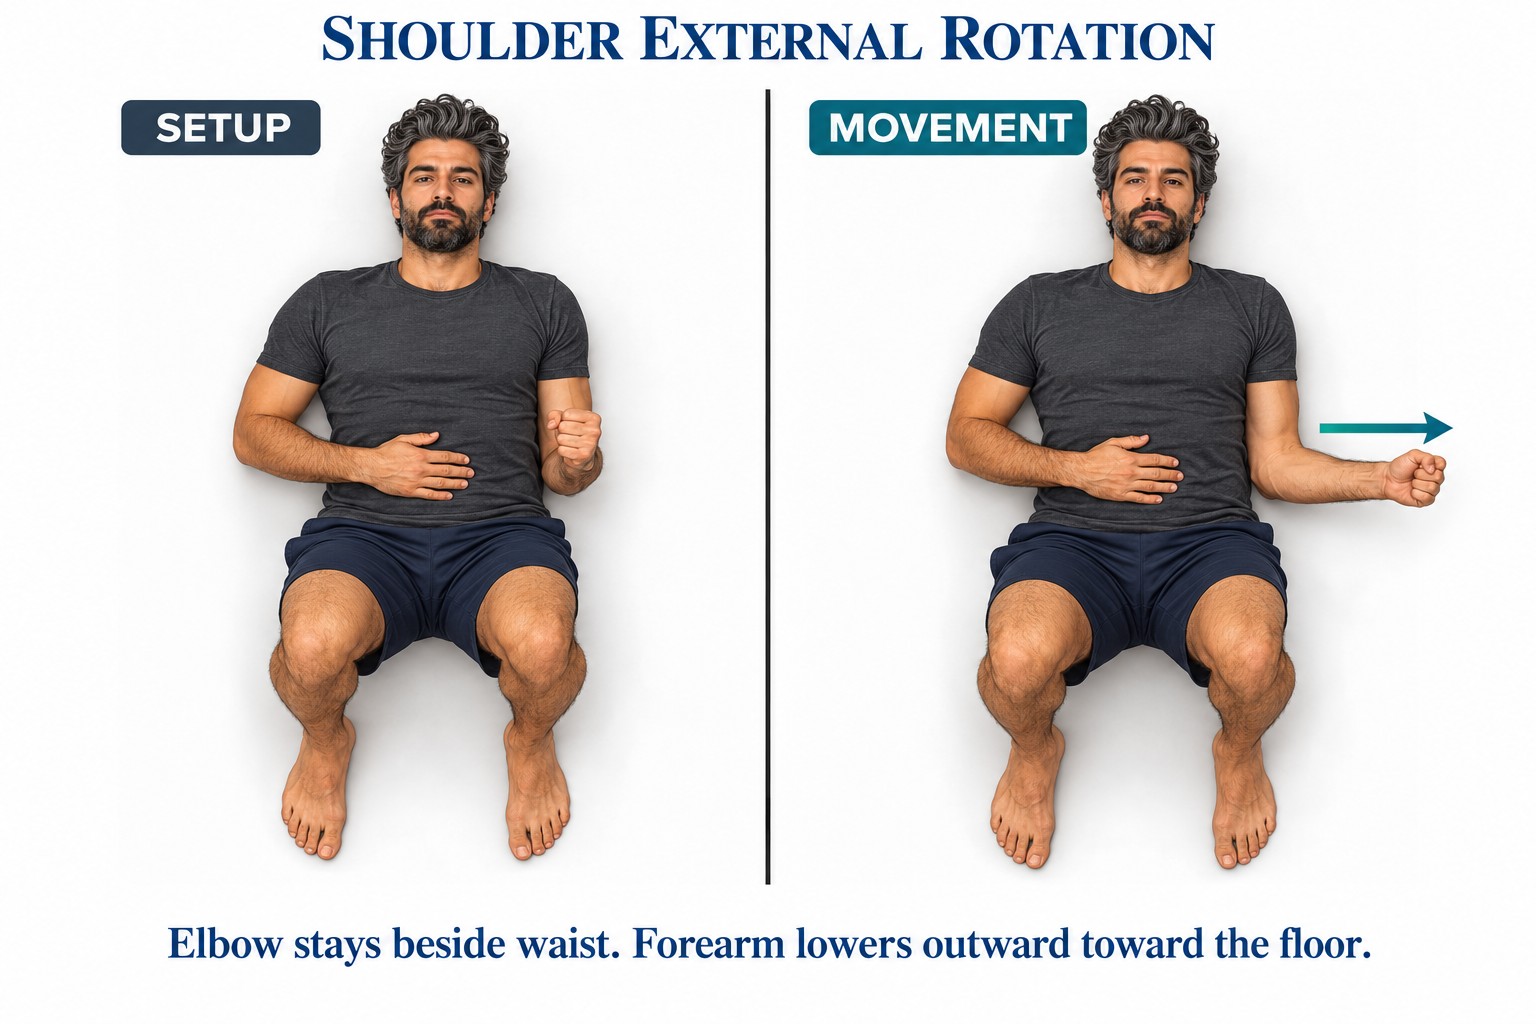
Set up & move
Lie on your back with your knees bent and feet on the floor. Place the testing elbow about one to two inches from your side. Bend the elbow so your fist points toward the ceiling. Rest your other hand lightly on your lower ribs. Keep your neck relaxed. Let the testing forearm fall slowly away from your body toward the floor. Stop at the first restriction or discomfort behind the shoulder, or when your lower ribs flare, your back extends, your elbow moves away from its starting point, or your neck joins the movement. Do not press the arm into the floor. Record the clean range and first compensation, then test the other side.
Keep these contacts
- Elbow remains close to the side and in place.
- Lower ribs stay quiet under the opposite hand.
- Neck and jaw remain relaxed.
- Forearm lowers slowly without being forced.
Stop when the setup changes
- Elbow slides away from the torso.
- Ribs flare or back arches to gain range.
- Shoulder lifts or neck tightens.
- Hand is forced toward the floor.
Left · Right · First change in position · Comfort / notes
Open this test in the PDF ↗Shoulder Abduction
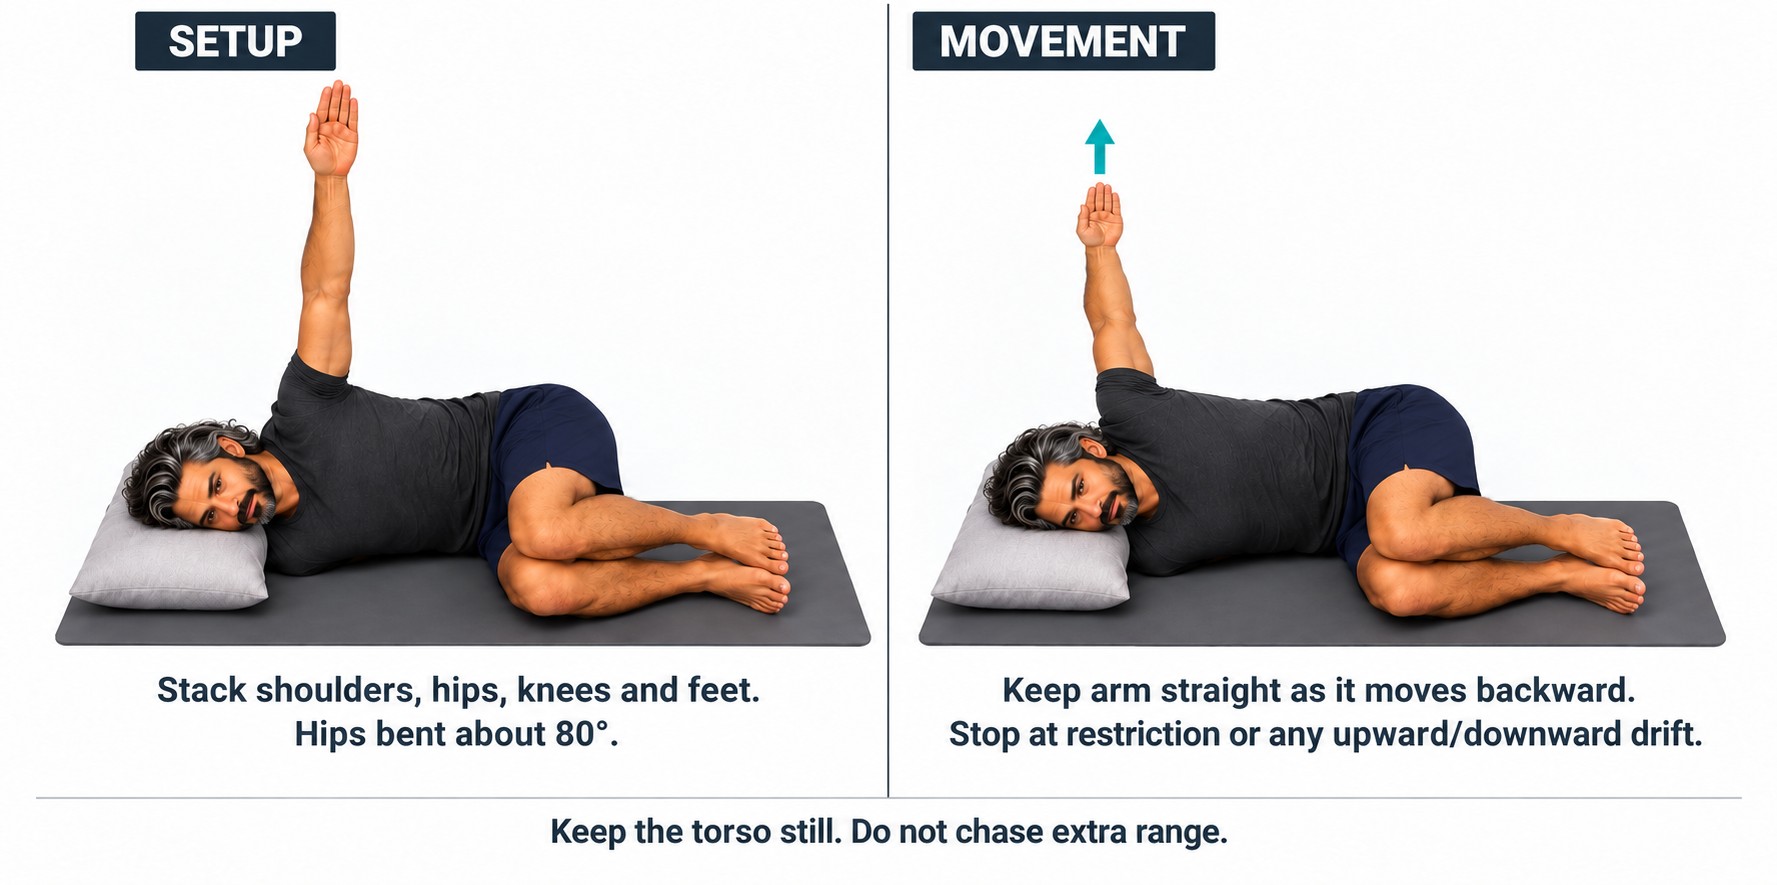
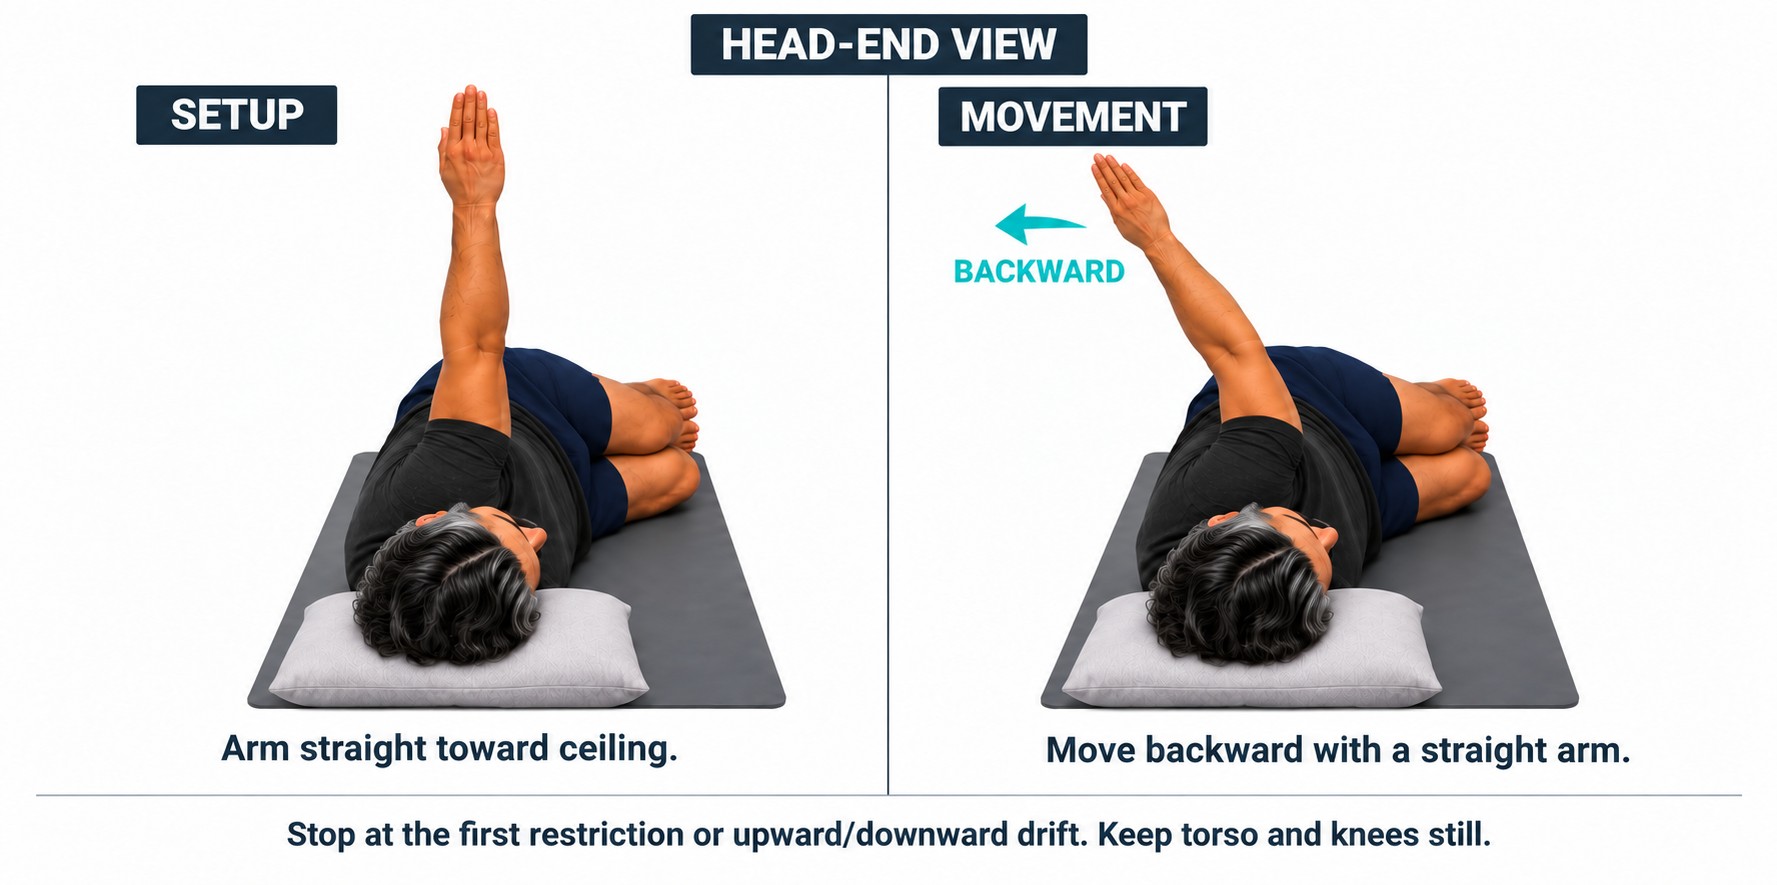
Set up & move
Lie on your side with your hips flexed about 80 degrees and your knees comfortably bent. Place the bottom arm beneath the pillow and rest your head on it, keeping your head and neck aligned with your spine. Stack your shoulders, hips, knees, and feet. Reach the top arm straight toward the ceiling. Keeping the elbow and wrist straight, move the arm slowly backward, away from the front of your body. Keep the torso still. Stop at the first restriction, any upward or downward drift from the movement path, trunk rotation, change in palm position, or discomfort. Return gently and repeat on the other side.
Keep these contacts
- Head and neck stay supported and aligned.
- Shoulders, hips, knees, and feet remain stacked.
- Arm stays straight as it moves backward.
- Torso remains still.
Stop when the setup changes
- Arm drifts upward or downward from its path.
- Elbow bends or wrist changes position.
- Chest or pelvis rolls backward.
- You push through restriction or discomfort.
Left · Right · First change in position · Comfort / notes
Open this test in the PDF ↗Active Hip Extension Test in Standing
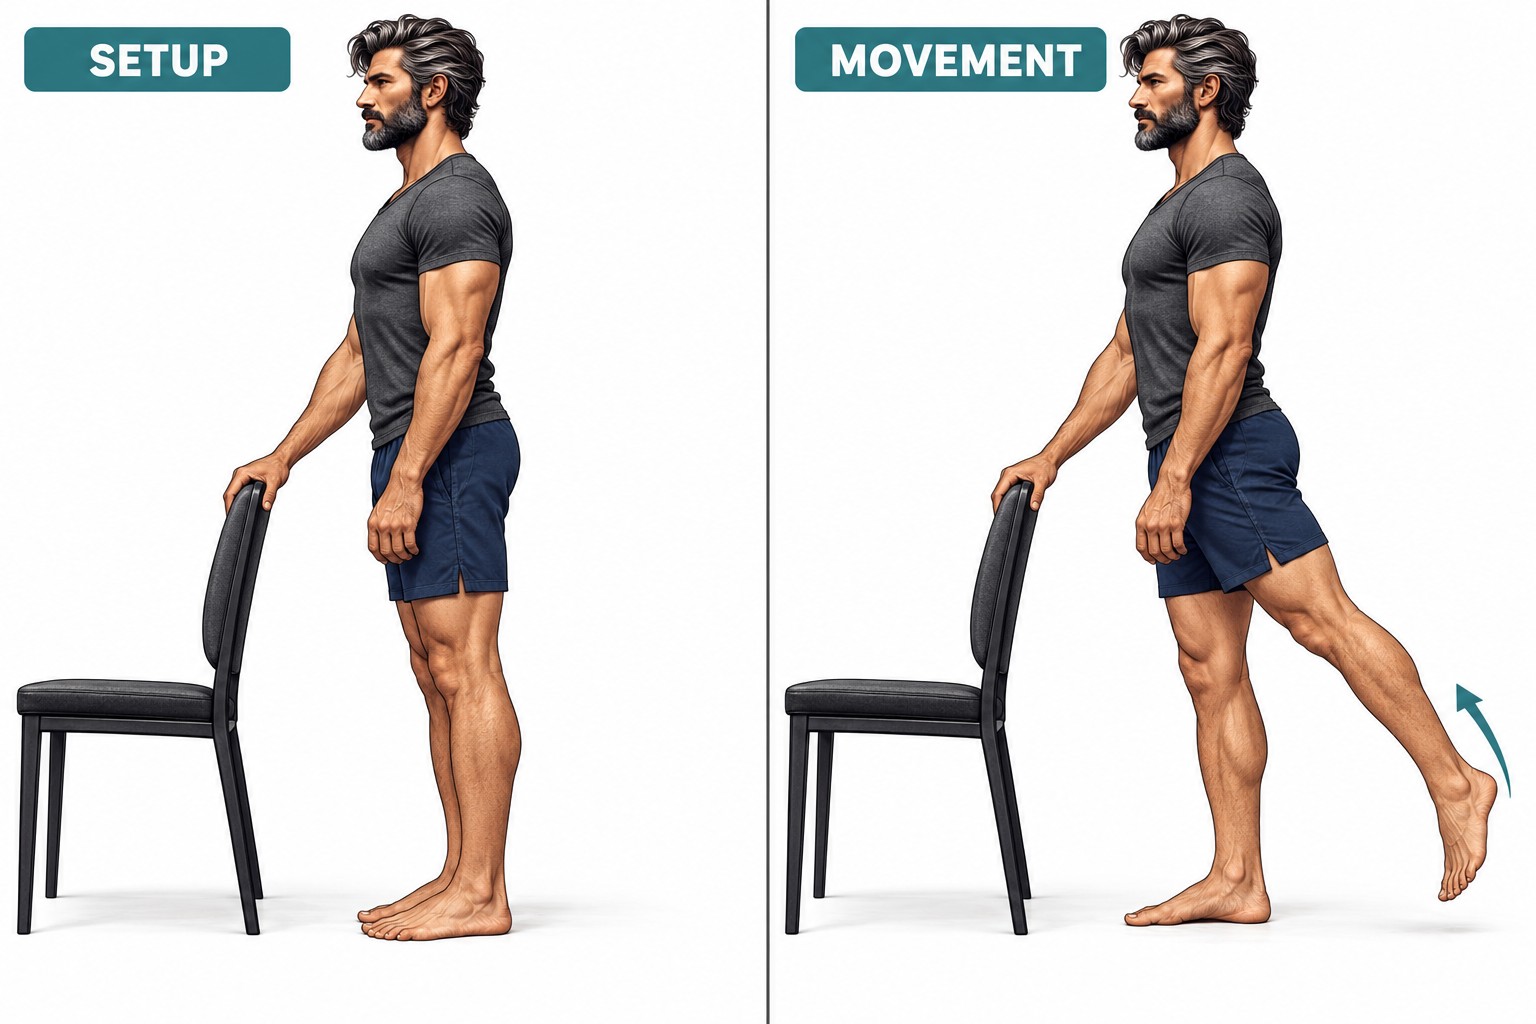
Set up & move
Stand tall with your feet about hip width apart. Use one hand on a wall or chair for light balance if needed. Keep your ribs relaxed over your pelvis and place your weight through the standing leg. Keep the testing knee straight and reach that leg slowly behind you without pushing through the toes. Stop when your low back begins to arch, your pelvis tips forward or turns, your trunk leans, the testing foot turns outward, the knee bends, or you feel discomfort. Return to the start and repeat on the other side. Record the clean range and the first compensation you notice.
Keep these contacts
- Ribs remain stacked over the pelvis.
- Testing knee stays straight.
- Pelvis continues to face forward.
- Movement comes from the hip without trunk lean.
Stop when the setup changes
- Low back arches or ribs flare.
- Pelvis tips forward, opens, or rotates.
- Testing knee bends or foot turns outward.
- Torso leans forward to manufacture range.
Left · Right · First change in position · Comfort / notes
Open this test in the PDF ↗Active Hip Extension Test in Sidelying
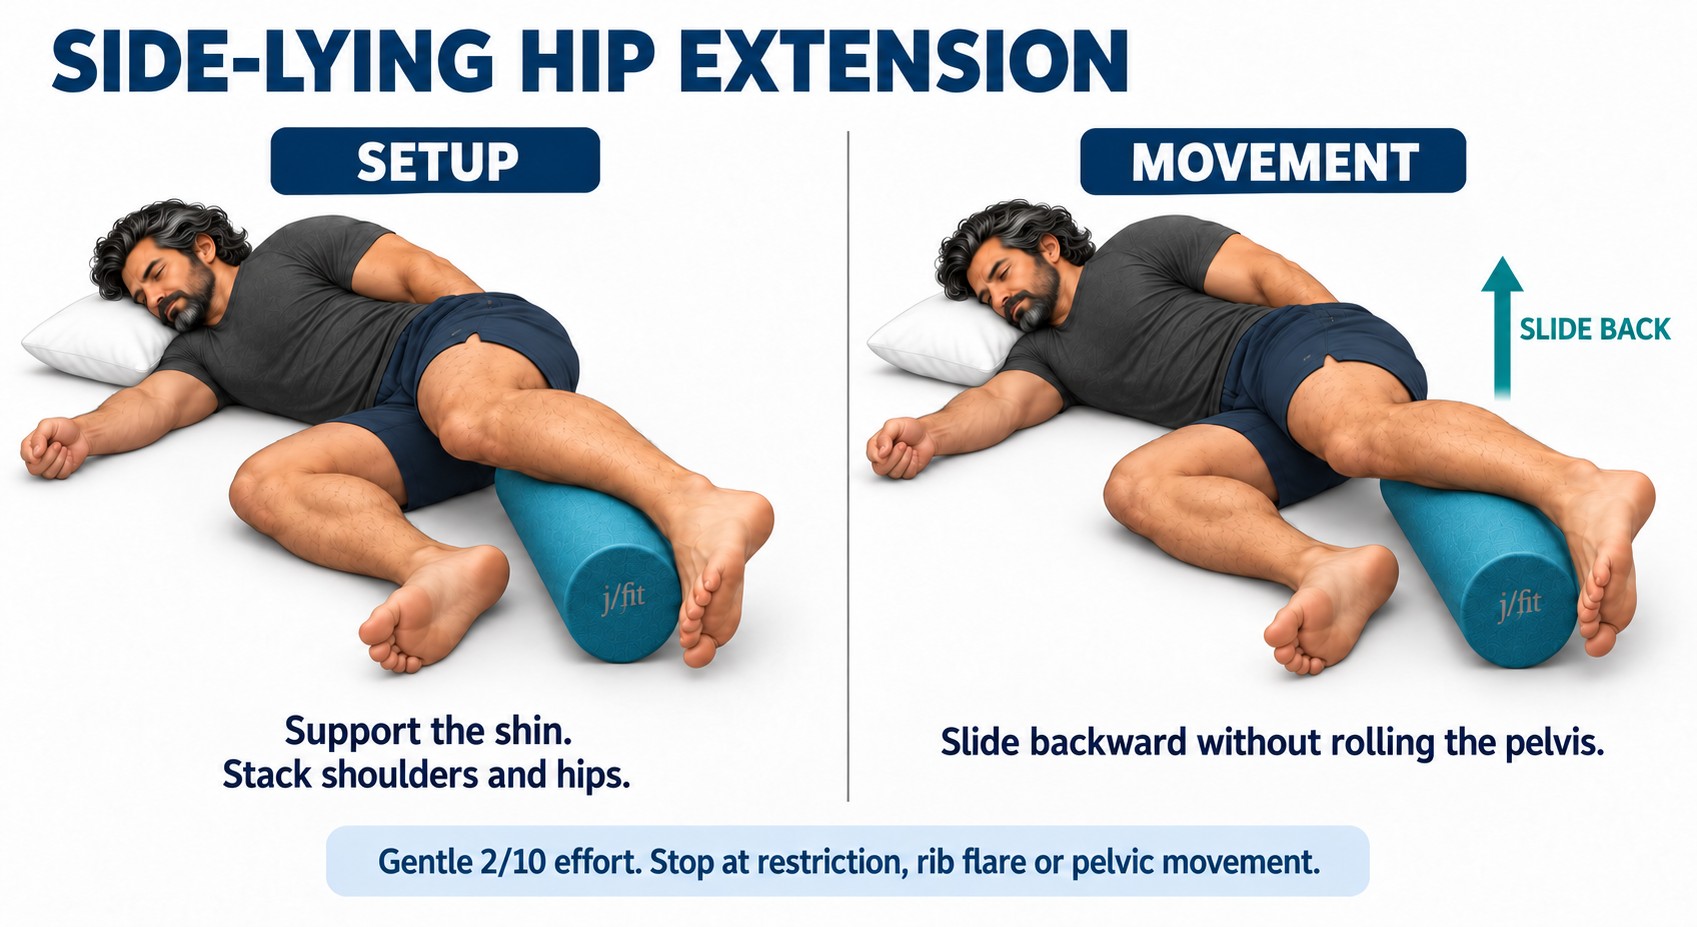
Set up & move
Lie on your side with a pillow supporting your head and neck so they can stay relaxed. Place a foam roller lengthwise beneath the shin of your top testing leg, parallel to the lower leg. Bring the bottom hip into about seventy to ninety degrees of comfortable flexion. Stack your shoulders and hips, and let your ribs rest over your pelvis. Keep the testing leg relaxed on the roller with a comfortable soft knee. Preserve that knee angle as the hip moves. Using only a two out of ten effort, slowly slide the top leg backward along the foam roller. Use the roller as your guide. Stop at the first restriction, rib flare, low-back arch, pelvic roll, leg rotation, or other compensation. The goal is not to force the leg farther behind you. Slide the leg forward to the starting position, reset, and repeat on the other side. Record the clean range and the first thing that changed.
Keep these contacts
- Pillow supports the head and neck.
- Foam roller stays beneath the testing shin.
- Bottom hip rests comfortably at 70 to 90 degrees.
- Shoulders and hips remain stacked.
- Testing leg slides backward at only 2 out of 10 effort.
- Ribs, low back, and pelvis remain quiet.
Stop when the setup changes
- Head or neck strains away from the pillow.
- Testing leg lifts away from or rolls off the foam roller.
- Effort rises above 2 out of 10 to gain range.
- Pelvis rolls or tips as the leg slides backward.
- Low back arches or ribs flare.
- Testing leg rotates, changes knee angle, or pushes through restriction or discomfort.
Left · Right · First change in position · Comfort / notes
Open this test in the PDF ↗Pelvis Rotation
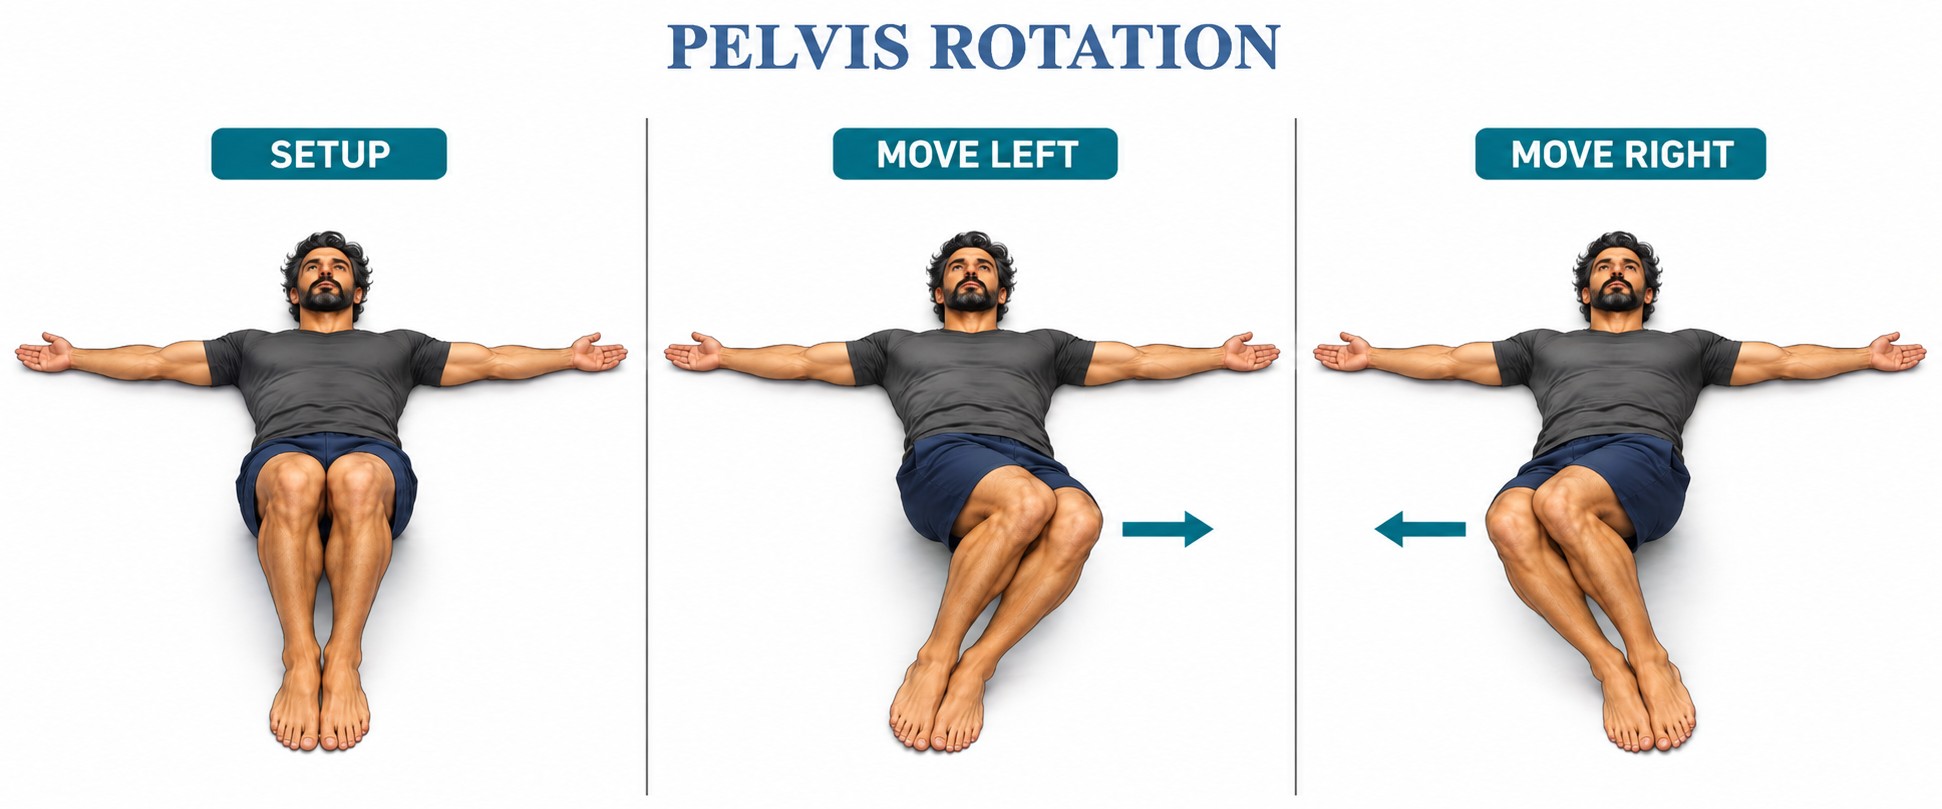
Set up & move
Lie on your back with your feet and knees together. Keep both feet flat and bring your heels comfortably close to your pelvis. Reach your arms out at shoulder height with your palms facing up. Keep your eyes and chin toward the ceiling. Now let both knees fall slowly toward one side as a single unit. Do not pull them down. Stop when the opposite shoulder begins to lift, the knees separate or stagger, your upper trunk turns, or you feel discomfort. Return to center and repeat in the other direction. Record which direction moved more easily and what moved first at your endpoint.
Keep these contacts
- Knees travel together as one unit.
- Eyes and chin remain toward the ceiling.
- Opposite shoulder stays heavy on the floor.
- Movement remains slow and controlled.
Stop when the setup changes
- One knee moves ahead of the other.
- Opposite shoulder or upper trunk lifts.
- Head turns with the knees.
- You push past discomfort to gain range.
Left · Right · First change in position · Comfort / notes
Open this test in the PDF ↗Hip Internal and External Rotation
Set up & move
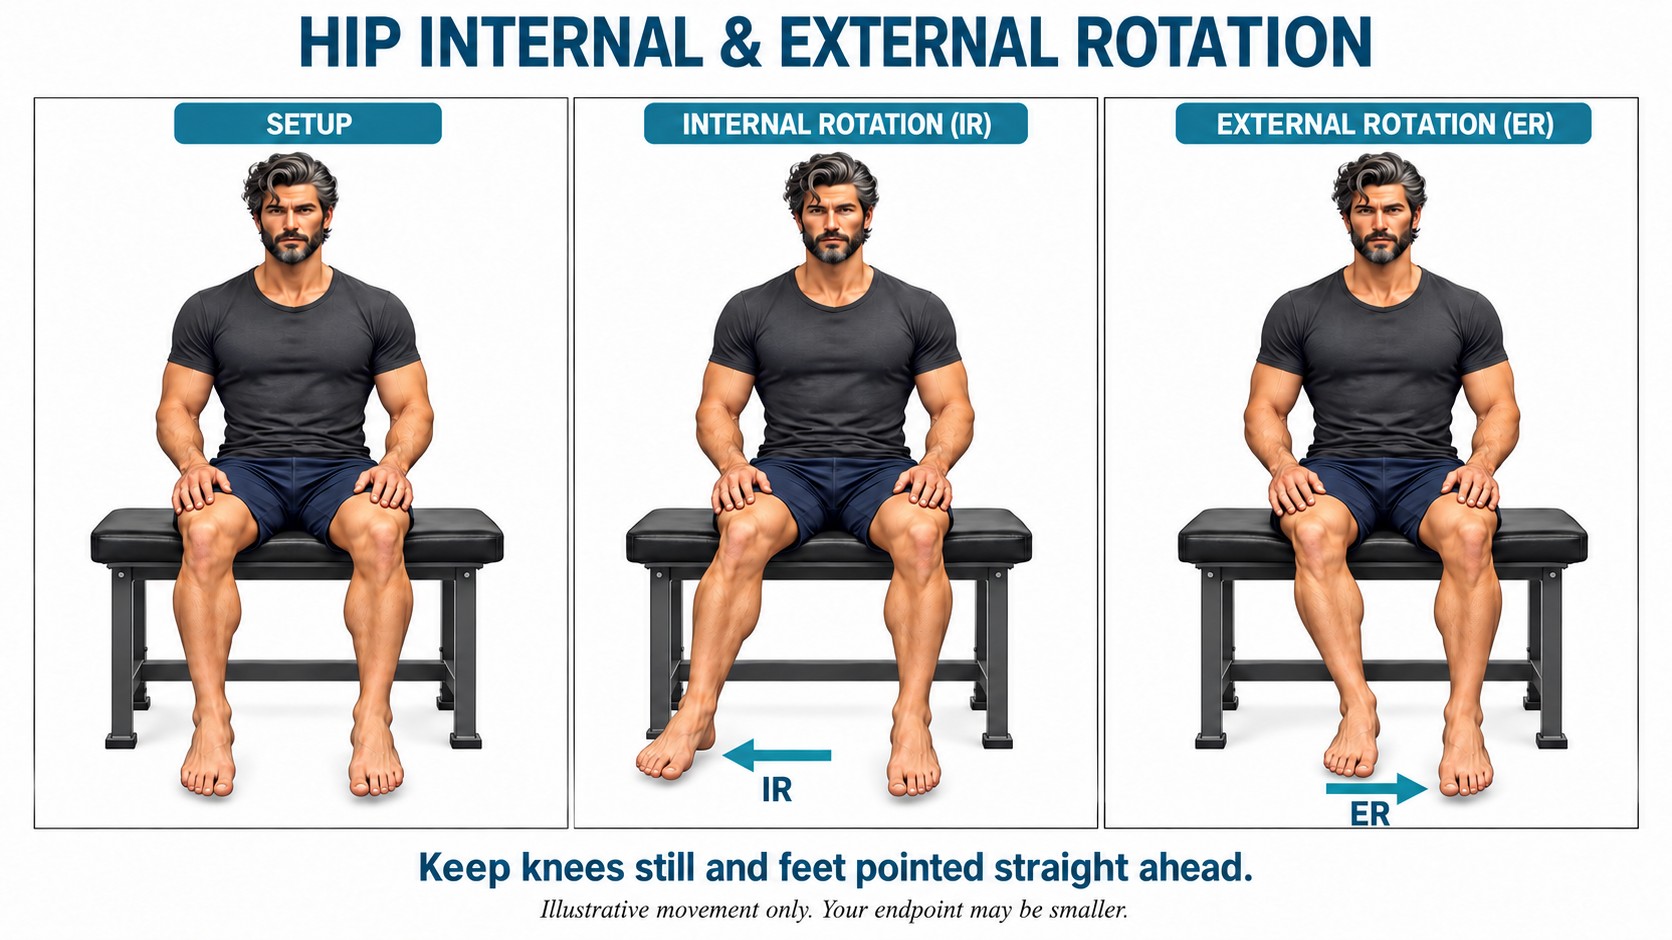
Sit on a surface high enough for your feet to hang freely. Begin with your hips and knees near ninety degrees. Keep your knees lined up with your hip joints, both sit bones in contact with the surface, and your ribs relaxed over your pelvis. For internal rotation, keep the knee centered and move the foot outward. Return to center. For external rotation, keep the knee centered and move the foot inward. Keep your feet pointed straight ahead throughout; do not turn the toes to manufacture range. Move gently and stop when your pelvis shifts, a sit bone lifts, your trunk leans or rotates, your knee drifts, or you feel cramping or discomfort. Test both sides and record the clean range and first compensation.
Keep these contacts
- Both sit bones remain in contact.
- Knee stays centered over its starting point.
- The shin moves without the trunk joining.
- The motion is gentle and unforced.
- Feet continue to point straight ahead.
Stop when the setup changes
- Pelvis rolls or shifts to create range.
- A sit bone unloads from the surface.
- Trunk leans, rotates, or ribs flare.
- Knee travels instead of staying centered.
Left · Right · First change in position · Comfort / notes
Open this test in the PDF ↗Active Hip Abduction Assessment
Set up & move
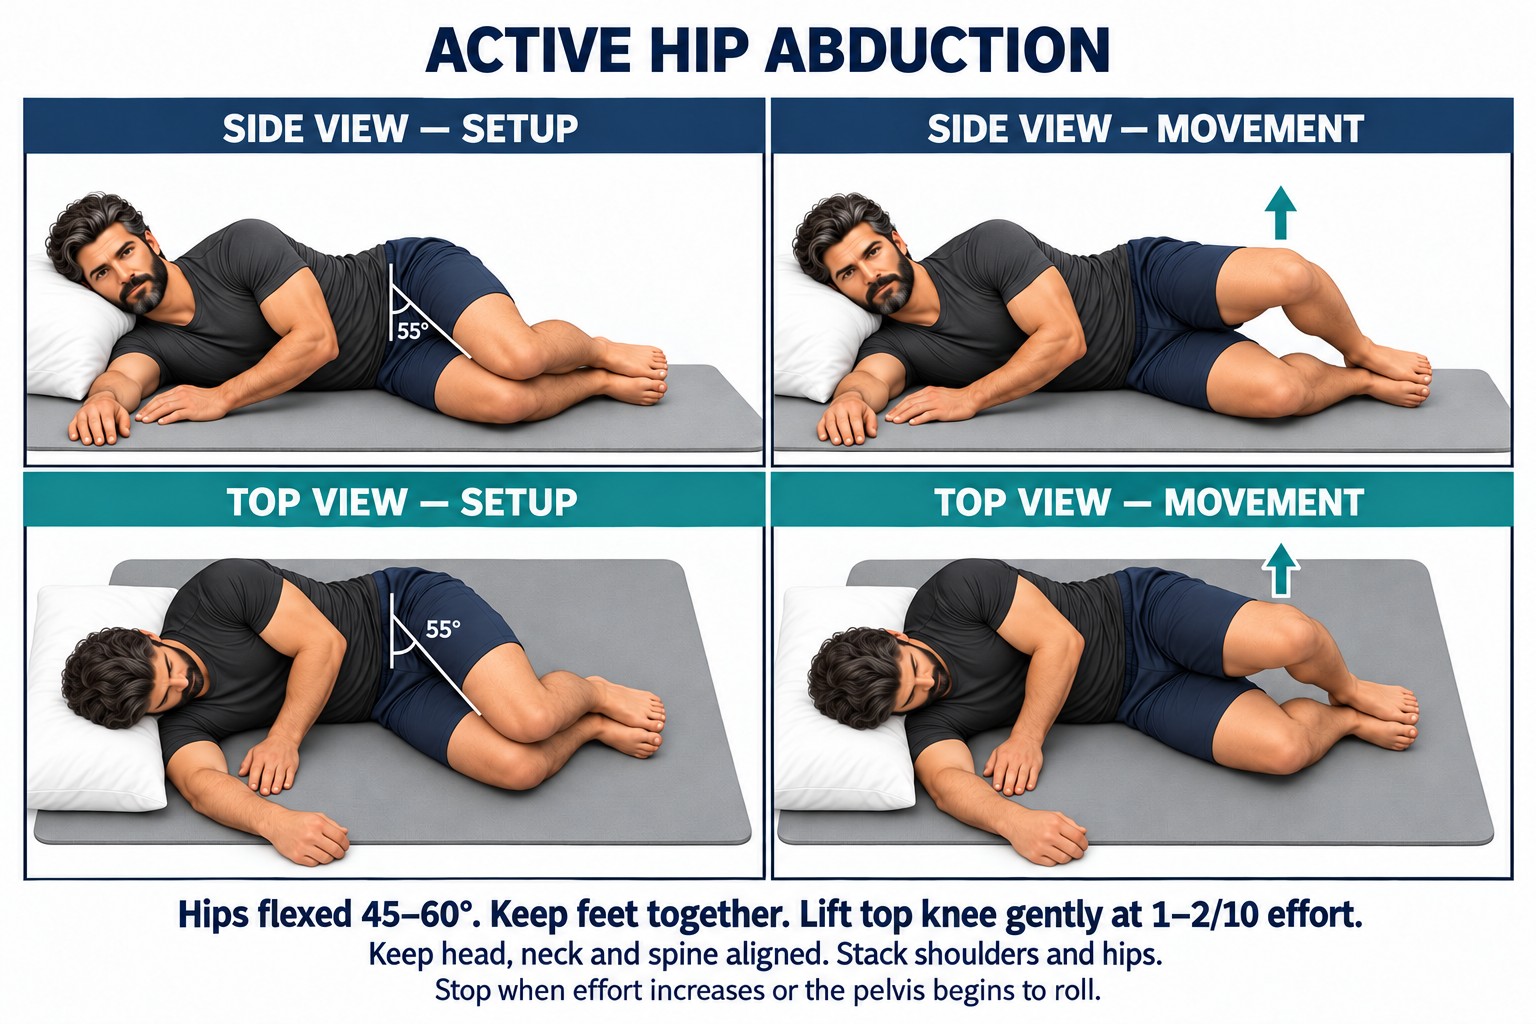
Lie on your side and place a yoga block or pillow under your head so your neck can stay relaxed. Bring both thighs forward into about 45–60 degrees of hip flexion, with your knees comfortably bent. Keep the head and neck aligned with the spine. Stack your feet, knees, hips, and shoulders directly on top of one another. Take a moment to make sure you are not rolled forward or backward. Keep your feet together. Slowly raise the top knee toward the ceiling. This should be a small, easy movement. Stop as soon as lifting any farther would require more than a one or two out of ten effort. Do not chase a bigger range. Lower the knee slowly, reset your stack, and repeat on the other side. Record your clean range and the first thing that changed.
Keep these contacts
- Head is supported and neck stays relaxed.
- Feet, knees, hips, and shoulders begin stacked.
- Feet stay together as the top knee lifts.
- Effort stays at 1 to 2 out of 10.
- Range is small, quiet, and controlled.
- Shoulders stay stacked and the neck stays in line with the trunk.
Stop when the setup changes
- You force the knee higher or chase a bigger range.
- Effort rises above 1 to 2 out of 10.
- Pelvis or top shoulder rolls backward.
- Feet separate, slide, or lose their stack.
- Trunk twists, ribs flare, or gripping, cramping, or pain appears.
Left · Right · First change in position · Comfort / notes
Open this test in the PDF ↗Straight Leg Raise
Set up & move
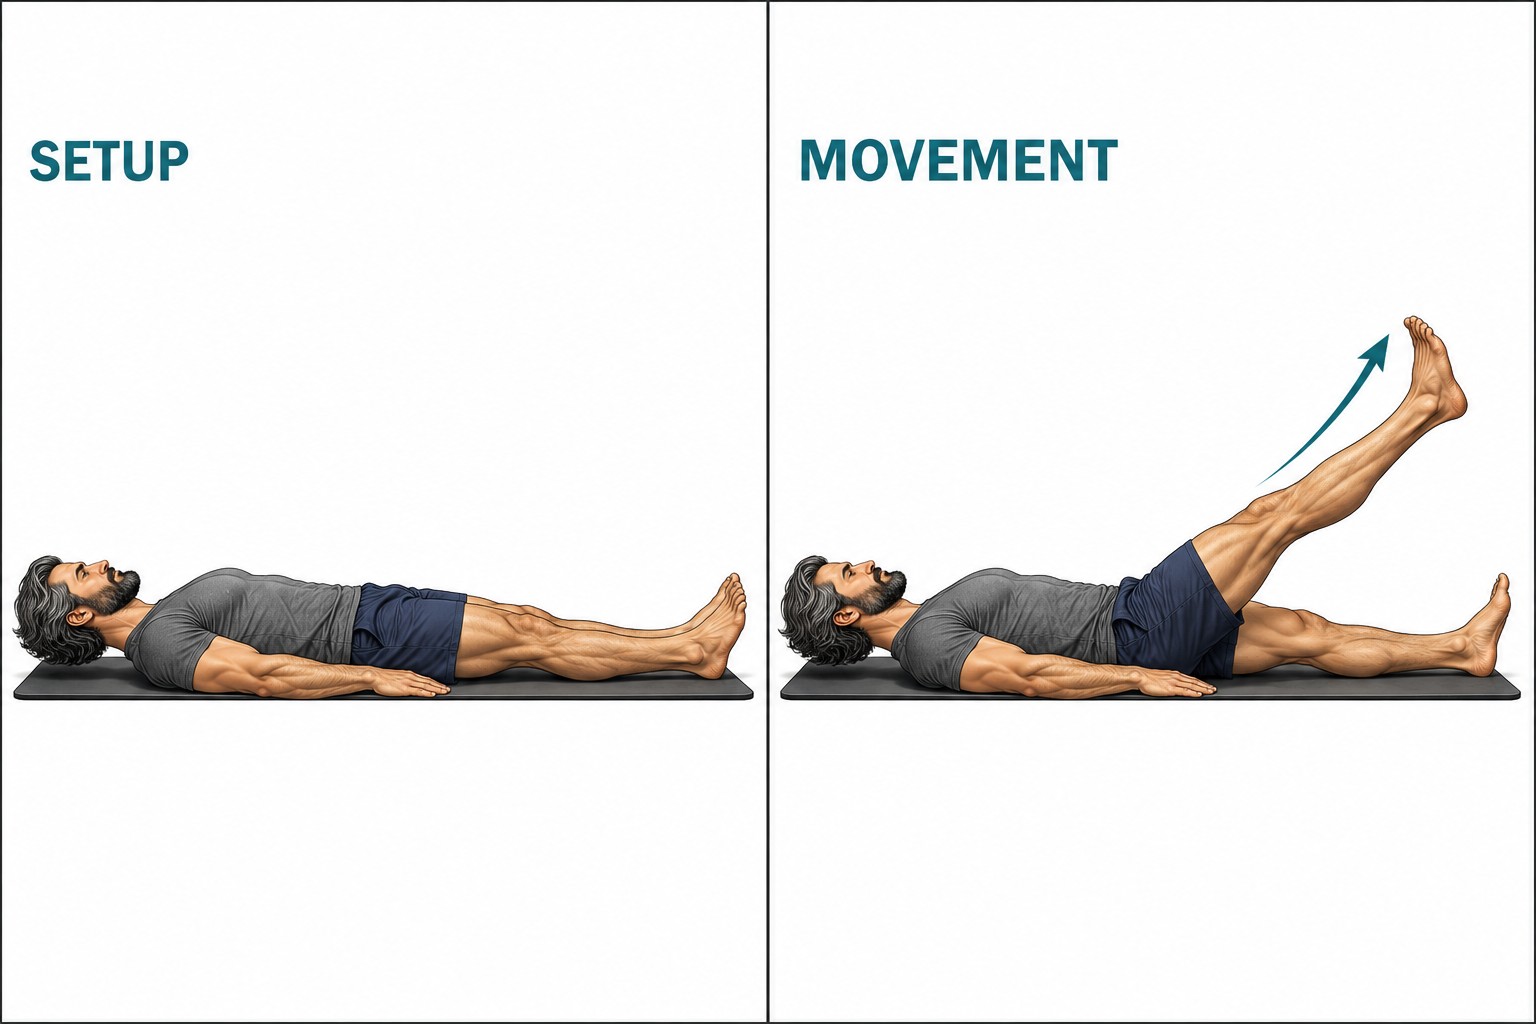
Lie on your back with both legs straight and your feet about hip width apart. Keep your neck relaxed and look toward the ceiling. Gently draw the toes of the testing leg back and keep the knee straight. Raise that leg slowly while the other leg stays long and quiet on the floor. Stop when the testing knee bends, the opposite leg lifts or rotates, your pelvis rolls or tucks, your trunk changes position, or you feel cramping, pain, or nerve-like symptoms. Lower the leg and test the other side. Record the clean range and the first compensation you notice.
Keep these contacts
- Testing knee remains straight.
- Opposite leg stays long and mostly still.
- Pelvis and trunk remain quiet.
- Movement is slow without momentum.
Stop when the setup changes
- Testing knee bends to gain height.
- Opposite leg lifts, turns, or slides significantly.
- Pelvis rolls, tucks, or leaves the floor.
- You force through cramping, pain, or nerve symptoms.
Left · Right · First change in position · Comfort / notes
Open this test in the PDF ↗OBSERVE → PRACTICE → RETEST
Give your observations a place to go.
Use the final pages of the PDF to record your baseline. Explore the Visual Read, choose a practical starting point, and return to the same setup when you retest.
Build your Home BaseExplore The Visual Read